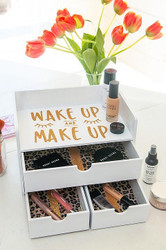
DIY Makeup Organizer
Posted by DecoArt on Jan 10th 2020
Now that the holidays are over, I'm so ready to get a couple of things organized in the house. But let's start with something a little more simple like my makeup. Organizing my makeup sounds a lot more fun, then organizing my closets or the kids' rooms.
I'm sure a lot of us out there need to get our makeup area organized, but always put it off. Not anymore ladies! This organizer is the perfect size to do that, but I needed to give it a little pizzazz first. Something more my style.
Let's get started!
Items Needed:
- Americana Multi-Surface Satin Acrylics 8oz - Cotton Ball (DA500-9)
- Small Drawer Organizer
- Paintbrushes
- Glitter Cardstock
- Gold Shimmer Leopard Faux Suede Trim
- Cutting Machine
Instructions:

To start this project off, I pulled out my trusty Americana Multi-Surface Satin paint in Cotton Ball. I painted my organizer solid white. For this particular project, I needed to do a total of 4 coats, letting each coat dry 10 minutes.

Once my paint had dried, I grabbed some shimmery leopard faux trim to line the drawers. I found this shimmery leopard trim at Hobby Lobby, and I knew it would be a fun addition to this makeup organizer. Who doesn't LOVE leopard right?!?

Measure out the inside of the drawers so that your liner will fit in perfectly. Use a pencil and measure on the backside of the material.

Next, pull out your handy dandy Americana Decou-Page!!

I added a thin layer of Decou-Page to the inside of the drawer and gently laid my liner inside. Make sure to smooth the leopard trim so no air bubbles POP up!

This is lookin' pretty cool so far!

One last touch to the inside of those drawers. I pulled out the glitter cardstock that I plan on using for my phrase. I cut three strips to line the center of each drawer.

Cover the back with Decou-Page and gently lay in place.

Finally, I used my Silhouette cutting machine to add this cute phrase on top with glittery cardstock.

I laid out my phrase first to center it correctly. Then I added my Decou-Page directly to the organizer and placed my letters on top. I used a wet paper towel to wipe up any excess of Decou-Page around the letters.

Once everything is dry you can start adding your makeup inside.

There you have it, a cute and chic makeup organizer. Which I'm desperately in need of. There is so much space to add everything inside.

You probably don't know this about me, I LOVE leopard! I don't really care about it in my home decor, but I really think this little peekaboo leopard is a nice surprise when opening the drawers.


As always thanks for stopping by, and I hope this project inspires you to make one of your own!


