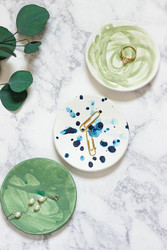
Air-Dry Clay Trinket Dishes
Posted by DecoArt on Jan 7th 2019
Hand-painted ceramics are all the rage right now and today I am sharing how you can create the look inexpensively. These DIY Air-Dry Clay Trinket Dishes are a sweet little craft and a great project for kids or anyone who wants to give a go at clay. Clay dishes like this make a pretty personalized gift, and they are so easy to make. They are fun catch-all dishes that can be used for small items.
I love beautiful organization ideas and these trinket dishes are just what I needed for displaying my jewelry on my dresser. I wanted to create a hand-painted watercolor look using Americana Acrylics. There are so many options of colors and designs you can make.
Items Needed:
- Americana Acrylics 2oz - Aloe (DA364-3)
- White Air-dry Clay
- Rolling Pin
- Round Cookie Cutter
- Bowl
- Water
- Paint Brushes
Instructions:
Start by gathering your supplies. These trinket dishes are great for using any Americana Acrylics paints to create cohesive dishes.

For these DIY Air-Dry Clay Trinket Dishes, I am using soft air-dry clay because it is easy to mold and shape.

Start by prepping a small workspace by laying out a piece of wax paper. Grab a handful of clay and start to roll it out using a rolling pin. You can make the clay any thickness that you like. I use a four inch round cookie cutter to cut out three circles.

I used three Anthropologie latte bowls to shape the dishes. Lightly press the clay into a bottom of a bowl and let dry overnight (this will give the dishes a rounded bottom). The clay may need extra dry time depending on the thickness. Just make sure the clay is completely dry before painting. I used a piece of fine grit sandpaper to smooth the edges of the dishes.

Next, is the fun part...painting. To create a watercolor look, I dip a paint brush into the Americana Acrylics then into a cup of water. You can make splatters, swirls, and any design you like. This is so fun for kids to make and for anyone creative who wants to start on an easy hand-painted clay project.


