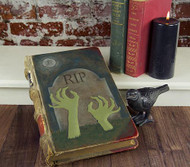
Zombie from the Grave Book Cover
Posted by DecoArt on Oct 2nd 2016
Get your Zombie on with a book cover decorated for Halloween with Value Kraft Stencils.
SUPPLIES
- water container
- palette or plastic plate
- paper towels
- transfer paper
- pencil
- painter's tape
- #2 round brush
- 1/4" flat brush
- cosmetic sponge
- book
INSTRUCTIONS
NOTES:
Let dry completely between painting steps.
Allow the book's original texture to show through.
- Wipe down the book cover with a damp paper towel to remove any loose debris. Don't worry about removing any old stains.
- Transfer the provided headstone template onto the book using transfer paper and a pencil. Using a 1/4" flat brush, dry-brush Neutral Grey onto the headstone area. Create a mix of (2) parts Neutral Grey and (1) part Lamp Black. Use this mix in random areas to create more depth.
- Mix together (2) parts Forest Green with (1) part Lamp Black. With the 1/4" flat brush, fill in the ground line underneath the headstone. With a #2 round brush, create small pieces of grass in the same mix. (Be sure to have the blades of grass facing in different directions for more realism.)
- Mix together (3) parts Neutral Grey and (1) part Lamp Black. Position the zombie hands stencil from the Value Kraft Creepy Stencil just slightly to the left of the center of the headstone, but 1" to 2" below the ground line. Tape in place. With a cosmetic sponge, lightly pounce the mix onto the stencil. (This will create a shadow for the hands.)
- Move the stencil down and slightly to the right (approximately 1/8"). Tape into place. Mix together (1) part Foliage Green with (1) part Snow White. Pounce this mix onto the zombie hands.
- Mix together (2) parts Midnite Blue with (1) part Lamp Black. With the 1/4" flat brush and the mix, paint the background above the ground line.
- Mix together (1) part Foliage Green with (2) parts Snow White. With a #2 round brush, lightly add highlights onto the right side of the zombie hands. (See photo.)
- Place an Americana Acrylic bottle (any color) onto the top left of the sky. Trace around the bottle with a pencil. With a 1/4" flat brush, dry-brush Snow White onto the circle. With the paint left on on the brush, dry-brush a light circle around the moon, fading the farther out it gets. (Refer to photo below.)
- With Snow White and the 1/4" flat brush, dry-brush highlights on the outside edges of the headstone. Transfer "RIP" from the template onto the tombstone. Using a #2 round brush, paint in the lettering using Lamp Black.


