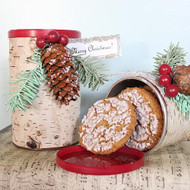
Decou-Paged Birch Bark Cookie Container
Posted by DecoArt on Nov 9th 2015
Send guests home with cookies housed in a seasonal container using Americana® Multi-Surface Acrylics.
SUPPLIES
- water container
- palette or plastic plate
- paper towels
- scissors
- 1" flat brush
- 1/4" flat brush
- hot glue gun and glue sticks
- cardstock
- beads
- glitter
- rubber bands
- birch bark
- pine cone
- container
- Epsom salts
- pine needles
INSTRUCTIONS
NOTES:
Let dry completely between painting steps.
- Clean the inside and outside of the container with a paper towel dampened with warm, soapy water.
- Paint the container with Cocoa Bean using a 1" flat brush. Allow the paint to dry completely between coats.
- Trim the birch bark or patterned bark paper to fit around the container. (Be sure that it doesn't overlap the edges of the container.)
- Using a 1" flat brush, coat the entire surface of the container with Americana Matte Decou-Page. Wrap the bark around the container and secure with rubber bands. Leave the container to dry completely. Once dry, remove the rubber bands and apply a coat of Decou-Page to the surface of the bark.
- Paint the pine cone in Cocoa Bean using a 1/4" flat brush. Use Soft Jade and Cactus to paint the pine needles, alternating between colors to create depth. Paint three 1/2" beads in Red Barn.
- With a hot glue gun, attach the pine needles. In the center of the pine needles, attach the pine cone. Adhere the three Red Barn beads on top of the pine cone. (Refer to photo for placement.)
- Apply Decou-Page to the edges of the pine cone. While it is still wet, quickly sprinkle on Epsom salts or Crystal Glamour Dust Sprinkle-On Glitter.
- Paint the outside of the lid in Red Barn using a 1/4" flat brush.
- Print the wording of your choice on cardstock. Cut out to the desired tag size. Use a 1/4" flat brush to apply Decou-Page to the outside edge of the tag. Quickly sprinkle with Epsom salts or Crystal Sprinkle-On Glitter. Tap away the excess glitter. Let dry. Once dry, use a hot glue gun to attach the tag.

