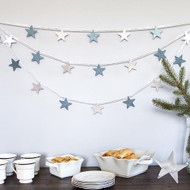
A DIY Winter Star Garland
Posted by DecoArt on Dec 27th 2016
Add a starry garland to any celebration this winter with Americana Decor® Metallics™.
SUPPLIES
- sandpaper
- ruler
- flat brush
- hot glue gun
- ribbon
- wooden stars
INSTRUCTIONS
NOTES:
Sand any rough edges on the wood stars before starting.
- Using a flat brush, apply Pewter to ten wooden stars. Let dry. Turn the stars over to paint all sides.
- Using a flat brush, apply Silver to the remaining ten wooden stars. Let dry. Turn the stars over to paint all sides.
- Cut three strands of ribbon to the following lengths: the shortest strand at 45" long; the middle strand at 50" long; and the longest strand at 60" long.
- Using a hot glue gun, apply a small dab of clear glue to the back side of a painted wooden star and press into place at the center of one of the ribbon strands.
- Space each star about 5-1/2" apart along the ribbon strand and alternate between Pewter- and Silver-painted stars. Attach five stars to the shortest strand; seven stars to the middle strand; and seven stars to the longest strand.


