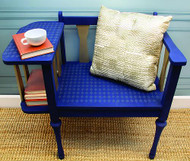
Vintage Phone Table in Chalky Finish
Posted by DecoArt on Feb 20th 2019
Revamp a vintage phone table with a harlequin print and Americana Decor® Chalky Finish™.
SUPPLIES
- water container
- palette or plastic plate
- paper towels
- rubbing alcohol
- sandpaper
- painter's tape
- cosmetic sponge
- foam roller brush
- paintbrushes
- vintage phone table
INSTRUCTIONS
- Sand areas of the table that need it, smoothing out the surface. Wipe down the surface with rubbing alcohol and brush the area down with a dry brush to make sure all dust is removed.
- Basecoat the rungs of the table in Lace.
- Paint the rest of the table in Honor. Allow to dry overnight.
- Mask off the area around the top and bottom of each rung with painter's tape.
- Using a foam roller and a dry brush, apply Champagne to each rung: Roll the foam roller onto a plate to ensure you will have a thin and even coverage, then roll onto the area. Use a dry brush to smooth out the texture and prevent streaking by gently dragging the brush down from top to bottom, barely applying pressure.
- Map out the area for the Distressed Harlequin stencil, leaving a border where necessary. Use a ruler to make sure the stencil is straight and aligned with the edge of the chair, then secure with painter's tape. Mix Honor with a touch of Lace to make a color one shade lighter than the chair. (A subtle contrast is key here.) Apply that mix to the stencil using a cosmetic sponge, dabbing off onto a plate first to make sure you apply a thin and clean coverage.
- Continue the stenciling over the entire seat of the chair and the top of the table.


