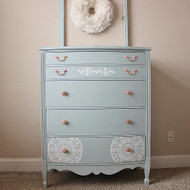
Upscale Vintage Dresser Makeover
Posted by DecoArt on Feb 4th 2016
Add a chalky finish and stenciling to a dresser for a designer look using Americana Decor® Chalky Finish.
SUPPLIES
- water container
- paper towels
- sandpaper
- painter's tape
- dresser
- 1" flat brush
- screwdriver
- 1" stencil brush
- 4" foam roller
- wood putty
INSTRUCTIONS
NOTES:
Let dry completely between painting steps.
- Prepare the dresser by filling any holes with wood putty. (If you are replacing the hardware, fill in any holes that won't fit the new hardware.) Use sandpaper to smooth any rough areas. Remove all the hardware. Wipe the entire dresser with a damp paper towel to remove any dirt or sanding dust.
- Paint the entire dresser with Vintage, using a foam roller for the large areas and a 1" flat brush for the small spaces. Allow to dry completely between coats.
- Place the Americana Doily Stencil in the desired location. Use painter's tape to hold in place, if needed. Using a 1" stencil brush, apply Everlasting to the stencil. (Do not overload the brush to prevent bleeding under the stencil.) Repeat with the Doily Stencil and the Americana Victorian Baroque Border Stencil as desired. (See final photo for this stencil placement.) Let dry.
- After the paint has dried, apply the Clear Crème Wax to all surfaces. Allow to dry. Re-attach the desired hardware to the dresser.


