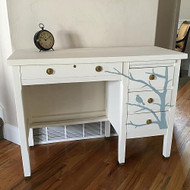
Tree Branch Desk Update
Posted by DecoArt on Feb 10th 2016
Branch out with this new furniture piece using Americana Decor® Chalky Finish paint.
SUPPLIES
- water container
- paper towels
- sandpaper
- soft cloth
- pencil
- painter's tape
- screwdriver
- 3/4" flat brush
- cosmetic sponge
- small liner brush
- craft knife
- school desk
- drill and small drill bit
- putty knife
- 4" foam roller
INSTRUCTIONS
NOTES:
Let dry completely between painting steps.
- Remove all hardware and handles from the desk.
- Remove any warped veneer with a craft knife and sandpaper. Fill the damaged spaces and unwanted hardware holes with Americana Wood Filler. Let dry. When dry, sand to level the surface.
- Clean all surfaces of the desk with a damp cloth. Tape off any areas that won't receive paint with painter's tape. Using a 3/4" flat brush and a 4" foam roller, apply Lace to the entire piece. Apply as many coats as needed, allowing the paint to dry between coats.
- Tape off any sides of drawers with painter's tape. Paint the front and sides of the drawers using a roller and Lace.
- Drill holes for the hardware placement. Attach the hardware temporarily to map out the branch. Lightly free-hand the outline of the branches on the piece of furniture. (For added realism, make sure that the branches get thinner as they climb higher.)
- Using a small liner brush, fill in the pencil design with Vintage.
- Position a bird of choice from the Americana Feathered Friends Stencil onto a branch, as desired. Use painter's tape to hold the stencil in place and a cosmetic sponge to apply Vintage. Remove the stencil carefully while the paint is still wet.
- Using a soft cloth, rub Clear Crème Wax over the entire piece. Cover all surfaces. Attach the hardware.

