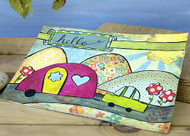
Traveling "Hello" Camper Postcard
Posted by DecoArt on Jun 28th 2015
There's nothing better, easier, or more fun than creating a postcard to keep in touch while on vacation.
SUPPLIES
- water container
- palette or plastic plate
- paper towels
- transfer paper
- scissors
- ruler
- pencil
- painter's tape
- #3 round brush
- 1" flat brush
- 1/4" flat brush
- #0 liner brush
- The Spellbinders® Grand Calibur® Machine
- scrapbook paper
- black fine-point permanent marker
- fan brush
- watercolor paper
- cosmetic sponges
INSTRUCTIONS
NOTES:
Let dry completely between painting steps.
- Cut a piece of watercolor paper to desired size of postcard (shown: 5"x7"). (Optional: Cut another piece the same size for the backing. The back of the postcard may get messy, so it can be covered with another piece of paper the same size. This will also add stability.)
- Create a mix of Titanium White, Cobalt Turquoise Hue, a small amount of Phthalo Turquoise, Burnt Umber, and a small amount of Carbon Black. Create a wash and apply to the entire surface. Use a paper towel to wipe back any areas that get too much pigment and to create a textured look. On a small scrap piece of watercolor paper, repeat the process. Set aside the scrap to be used later.
- Tape of one sun ray using painter's tape. Create a mix of Titanium White with a small amount of Hansa Yellow Light. Using a cosmetic sponge, apply mix to the taped area. Allow paint to fade out and dry completely between taping. Tape off next ray and repeat until desired look is achieved. Refer to photo for fading and placement.
- Run the desired shape for the sun through the Spellbinders machine using yellow scrapbook paper (or watercolor paper). Use the same color from the rays to paint the sun.
- Using the transfer paper, trace the hills and foreground on different patterned scrapbook papers. (If they come off the sides of the postcard, they can be trimmed later.) Do NOT glue the pieces down yet.
- Transfer the pad pattern. Create a mix of Carbon Black and Titanium White. Apply a slightly translucent wash to the road. Let dry completely. Dip the very corner of a cosmetic sponge into water and then into Burnt Umber to create a distressed edge on all pieces. (Refer to photo.) Practice on a scrap piece of paper if needed. Adhere all pieces to the surface using Matte Medium; trim to fit the surface.
- Transfer the camper and car patterns to a piece of watercolor paper. Paint the camper with a wash of Quinacridone Magenta. Distress the edge with Burnt Umber. Paint the car in Green Gold. (This is not reflected in the photo.) Do not cut out yet. Paint a small scrap piece of watercolor paper in Hansa Yellow Light.
- Position the heart cut-out on the camper as desired. Position the flower cut-out on a piece of yellow watercolor paper. Run both pieces through a Spellbinders machine. Cut the yellow piece to the size of the door. Put the camper and car in an embossing folder of choice and run through a Spellbinders machine. Highlight the texture and distress all pieces using a fan brush and Burnt Umber.
- Cut the scrap watercolor paper from step 2 to the size for the window cut-outs. Use the transfer paper to trace the pattern for car windows and cut-out. For the camper, adhere the paper to the back of camper and door using Matte Medium. For the car, adhere to the surface of car using Matte Medium.
- Cut three pieces of small scrapbook paper; position cut-out die; and run through a Spellbinders machine at one time. Position flowers and adhere using Matte Medium. Use a mix of Green Gold and Burnt Umber for the stems and leaves.
- Run the label on patterned scrapbook paper through a Spellbinders machine. Paint the middle with a mix of Titanium White, Phthalo Turquoise, Burnt Umber, and Green Gold. Let dry. Once dry, free-hand a word of choice onto the label using a liner brush and Carbon Black. Outline in Green Gold. Cut a piece of patterned scrapbook paper into a strip. Distress with Burnt Umber and cosmetic sponge. Adhere the label and strip to the surface and cut to fit.
- Outline the elements using a liner brush and Carbon Black. Add the tires on the camper and car in the same color. (Refer to photo.)
- Adhere the extra watercolor backing to the back of the postcard using Matte Medium.
- Using a fine-tip black permanent marker, write the name and address of the person the postcard is being sent to on the right-hand side of the postcard. On the left-hand side, write a desired message. Visit a Post Office to determine the current amount of postage.


DOWNLOADS
Camper PatternLandscape Pattern

