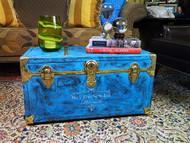
Travel Trunk Coffee Table
Posted by DecoArt on May 27th 2014
Give an old travel trunk two new purposes: as hidden storage and as a colorful accent table.
SUPPLIES
- water container
- palette or plastic plate
- paper towels
- sanding block
- 2" flat brush
- 5/8" stencil brush
- paraffin
- 1" painter's tape
- storage trunk
INSTRUCTIONS
NOTES:
Let dry completely between painting steps.
- Wipe down the trunk with a damp paper towel to remove any dust or residue.
- Rub paraffin over the trunk where you want the trunk surface to show through. (Do not wax the whole trunk.)
- Use a 2" flat brush to paint the entire trunk Rustic. Rinse brush.
- When the paint is dry, use a sanding block to distress the trunk. (You'll see in the sanded areas that the paint will be removed and leave an aged look like the paint has chipped and worn away over time.) Dust off with a damp paper towel.
- Rub paraffin again over the trunk in areas you would like the Rustic and original surface color to show through. (Areas where the paint has worn away is a good place to start. Get the details again too.)
- Use the 2" flat brush to paint the entire trunk Treasure. (You don't have to be perfect, but do be careful around the metal hinges and straps.) Rinse brush.
- After the paint is dry, go over it again with a sanding block to reveal a perfectly aged, colorful trunk.
- Use the painter's tape to attach the Cafe Paris stencil in place on the front of the trunk.
- Use a 5/8" stencil brush with Yesteryear to fill in the address only. Rinse brush. Let dry completely.
- Use a 2" flat brush to seal the entire trunk with Ultra-Matte Varnish. Rinse brush.


