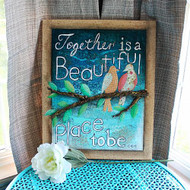
Together is A Beautiful Place Mixed Media Panel
Posted by DecoArt on Feb 25th 2016
Then move the panel to the happy couple's new home for a lasting reminder.
SUPPLIES
- water container
- palette or plastic plate
- paper towels
- tracing paper
- transfer paper
- scissors
- pencil
- painter's tape
- saw
- #2 round brush
- 3/4" flat brush
- cosmetic sponge
- black fine-point permanent marker
- craft knife
- assorted scrapbook paper
- bubble wrap
- E6000 Glue
- newspaper
- particleboard
INSTRUCTIONS
NOTES:
Let dry completely between painting steps.
- If needed, cut the particleboard down to 16" x 20". (Most home improvement stores will provide this service for you, if you don't have the necessary tools). Apply a coat of Satin Varnish onto the entire surface of the particleboard. Let dry completely. Once dry, apply a 1-1/2" painter's tape around the edges of the board.
- Tear the blue scrapbook paper into random strips. Using Matte Medium, glue the strips of paper down to the particleboard. Seal in each piece of paper as you go by brushing a layer of Matte Medium on top of each piece. (Keep the lighter colored papers grouped close to the bottom of the panel and, as you work toward the top, use the darker colors papers to create an ombre look.)
- Apply small pieces of 1-1/2" painter's tape into each of the corners. (Use these as a guideline to line up the ruler.) Use a craft knife to cut through the scrapbook paper that extends over the first layer of painter's tape. Remove the tape to reveal the wooden border of the panel.
- Apply a fresh layer of painter's tape around the panel to cover the wood border. Apply a coat of Matte Medium along the edges of the tape to prevent later paint layers from bleeding under the tape.
- Mix a little bit of Matte Medium with Cobalt Teal Hue. Brush over the patterned paper starting from the bottom and working your way up toward the top. Mix a little bit of Matte Medium with Phthalo Turquoise and brush the mix over the patterned paper, starting at the top of the panel and working down.
- Use a finger to rub Titanium White into the bottom corners. Use a finger to rub Phthalo Turquoise in the upper corners. Brush Gold (Metallic) onto a piece of bubble wrap and press onto the canvas to leave a pattern in the background.
- Use the Americana Doily Stencil with a cosmetic sponge and Phthalo Turquoise to stencil on the upper left hand corner of the panel. Use the Turquoise (Shimmer) Mister to mist the top of the panel. Use the White (Shimmer) Mister to mist the bottom of the panel.
- Twist a piece of packing paper or newspaper tightly to create a branch. Repeat with two smaller pieces to make the twigs coming off the branch. Use E6000 Glue to glue the branch and twigs onto the middle of the panel. (Start by gluing down one end, then keep twisting the paper tightly and gluing as you go to prevent the paper from loosening.)
- Mix Burnt Umber with a few drops of Payne's Grey and of Quinacridone Violet. Brush this mix onto the branch. Let dry. Once dry, use a finger to rub Gold (Metallic) onto the texture of the branch. Remove the tape border from panel and lightly fade the Gold (Metallic) out to the edge of the panel.
- Print off and cut out the bird patterns. Use a pencil and the tracing and transfer papers to transfer the shapes onto brightly-colored scrapbook paper in a coordinating color. Cut out the pieces from scrapbook paper. Apply Matte Medium onto the panel where you want the birds positioned. Place the pieces of each bird onto the panel one at a time, coating each piece with a layer of Matte Medium after it is positioned.
- Use scissors to cut random leaf shapes from green scrapbook paper. Brush Matte Medium onto the panel where the leaf will go, position, and apply another layer on top. Repeat until the desired amount of leaves is achieved.
- Use white transfer paper to transfer the quote to the panel.
- Use Titanium White and a #2 round brush to fill in lettering. (Use two coats to have crisp letters.)
- Outline the letters with a black permanent marker twice. (Allow for imperfections.) Spray the entire panel with a coat of Americana Gloss Spray Finish to seal.


DOWNLOADS
Birds Pattern"together Is A..." Pattern

