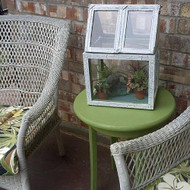
Crackled Terrarium from Reclaimed Frames
Posted by DecoArt on Oct 22nd 2015
Use old frames to create a new terrarium using Weathered Wood.
SUPPLIES
- palette or plastic plate
- paper towels
- ruler
- E6000 glue
- painter's tape
- saw
- 1" flat brush
- screwdriver
- wood glue
- tacks
- hammer
- craft sticks
- cutting mat
- craft knife
- trim
- drill and small drill bit
- wooden embellishment
- screws
- wooden frame
- embossed metal
- tin snips
- silicone caulk
INSTRUCTIONS
NOTES:
Let dry completely between painting steps.
- Turn the frames over and using a small screwdriver, unscrew the pieces holding in the glass and backing out of the frames. Remove the glass and backings and set aside.
- Using a ruler, measure in 1" from the edge of the 8"x10" and 6"x8" frames. These will be used as a guide for your pilot drill holes.
- Holding the frame down on a wooden block, drill a small pilot hole on the mark. Repeat on all of the base frames.
- Run a large bead of wood glue on the edge of the 8"x10" frame and press together onto the 6"x8" frame. Screw into place. Repeat with the other two frames.
- Attach both sections together with wood glue. Screw into place.
- Measure and cut the decorative wood trim to 10.5".
- Glue (2) 4"x6" frames together on the 6" sides with wood glue. Hold in place with painter's tape. Repeat with the other two 4"x6" frames. Allow to dry.
- Glue the trim onto one of the frame tops. Hold in place with painter's tape until dry.
- Using wood glue, attach the two terrarium top pieces together along the trim to create a roof.
- Take (6) jumbo craft sticks and line them up horizontally. Run a large bead of wood glue on another jumbo craft stick and place it vertically on top of the others. Make two of these.
- Lay the roof on top of the sticks. Trace on the outside of the roof. Lay the stick piece on a self-healing cutting mat. Cut just the inside line with a metal ruler and craft knife. Put a bead of wood glue on the end edge of the roof. Attach to the craft stick piece. Repeat on the other side. Attach a wood flower on top to cover the ends.
- Paint the inside of the top and base with Celery Green.
- Paint the outside of the top and base with Lamp Black.
- Using a 1" flat brush, apply Weathered Wood to the outside. Allow to dry. A thicker coat produces larger crackles, a thinner coat will produce smaller.
- Apply a coat of Snow White.
- Measure 11"x8.75" on the wrong side of the galvanized metal. cut out using tin snips, just inside the line. Paint the tin with Black Tie. While still wet, wipe away paint with paper towel, leaving paint in the embossed areas.
- Create a 1:1 mixture of Deep Turquoise and Cactus to form a patina color. Brush onto metal and while still wet, wipe away with paper towel.
- With bottom of the terrarium side up, using E6000 to attach the tin. Drill 10 to 12 pilot holes in the tin.
- Hammer a tack into the pilot holes
- Apply a coat of Duraclear Matte Varnish over surfaces.
- Clean glass with rubbing alcohol. Run a bead of silicone to the inside of one of the frames. Take glass and lat it onto glue. Hold in place for a few seconds, Repeat to attach all glass to terrarium.


