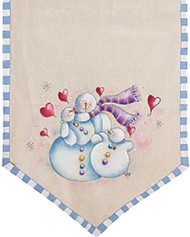
Snowman Family Table Runner
Posted by DecoArt on Nov 20th 2014
Mom Snowman and the kids give a bit of winter whimsey to a casual table runner.
SUPPLIES
- water container
- palette or plastic plate
- paper towels
- tracing paper
- #6 flat brush
- #12 flat brush
- 1/4" angle brush
- stylus
- black fine-point permanent marker
- #2 flat brush
- grey transfer paper
- canvas tablerunner
- 1/2" angle shader brush
INSTRUCTIONS
NOTES:
If the table runner you choose is not already suitable for painting (or if you are unsure), wash and dry the fabric before use. Do not use any fabric softener in the washer or the dryer, as doing so will create a coating on the fabric.
- Iron the tablerunner flat.
- Trace the design onto the table runner with grey graphite paper, making sure to trace all the design elements.
- Use a black fine-point marker to ink the design.
- Starting with the first snowman’s head, take a clean 1/2″ angle shader brush and dip it into the Transparent Medium and then coat the whole head. (This is a clear medium, so it is OK to go over the edges.)
- With the brush still wet with the Transparent Medium, pick up a little bit of Ivory and basecoat the head. (Try not to cover the nose or any other elements that will end up a different color. Also try not to cover up the inked lines, although they can always be touched up later after the project is completed and dry.) The basecoat does not need to be perfect; allowing the background to show through adds to the finished look.
- Once you have basecoated the head with Ivory, corner-load the same brush with Baby Blue Deep and shade the left side of the head. Pat the shading in softly to blend.
- Clean the brush with water and dry well with a paper towel.
- Dress the brush with Transparent Medium, corner-load into White, and float the highlight on the right side of the snowman’s head. Pat to blend.
- Deepen the Baby Blue Deep shading with True Blue.
- Brighten the White highlights with more White.
- After the head is complete, repeat the process for each part of the snowman’s body.
- Repeat steps 4 through 11 for the other two smaller snowmen.
- For the snowmen faces, wet a brush with Transparent Medium. Pick up a little bit of Red Alert and gently pat the snowmen's cheeks with it.
- Basecoat the nose with Bittersweet Orange and then shade with Crimson.
- Dot the eyes and mouth with Lamp Black. Dot the cheeks and add a sparkle in the eyes with White.
- For the scarf, refer to the photo for color placement and basecoat the wider stripes with Dioxazine Purple.
- Basecoat the scarf's narrow stripes with Bright Yellow and shade with Bittersweet Orange.
- Dot the scarf fringe with Dioxazine Purple. While the dots are still wet, lightly and quickly drag a brush through the dots to create the fringe. Using Wisteria, add a smaller dot to the middle of the first dots.
- Referring to the photo for color placement, basecoat one button on each snowman with Bright Yellow. Shade with Crimson and highlight with White.
- Referring to the photo for color placement, basecoat one button on each snowman with Baby Blue Deep. Shade with True Blue and highlight with White.
- Basecoat the remaining buttons with Wisteria. Shade with Dioxazine Purple and highlight with White
- Basecoat all the hearts (including the necklaces) with Red Alert. Shade with Crimson. Float a highlight in the upper right corners with White.
- Mix a small amount of White and very little of the Transparent Medium on the brush to create an almost dry-brush effect. Using the photo as a guide, dry-brush White on the snowmen's bodies, especially the bottoms of the snowmen.
- Dry-brush a White highlight on the scarf and on the upper right corners of the buttons and the hearts.
- Using the coordinating SoSoft Fine Glitters, float over all of the shading in the complementary fine glitter color. Dress the brush first in Transparent Medium and then pick up the glitter. (The Ice Crystal really makes the bodies sparkle.)
- Add a little color into the background by first brushing a good amount of the Transparent Medium onto the background and then brushing a little bit of glitter into the Transparent Medium. (When it dries, it only leaves a hint of color.)
- Draw in all the snowflakes and snow with the fine-point marker.
- Add dots of White to the small flakes and the points of the large flakes.
- With a ruler and the fine-point marker, draw a 1/2″ border around the table runner. Draw in 1/2″ checks.
- Basecoat the checks, alternating between White and Baby Blue Deep.

