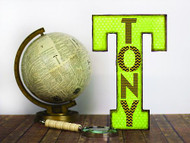
T for "Tony" Letter
Posted by DecoArt on Oct 12th 2015
Add a name to the letter with DecoArt® Personally™ Yours Stencils.
SUPPLIES
- water container
- palette or plastic plate
- paper towels
- sandpaper
- scissors
- pencil
- 1" flat brush
- #12 flat brush
- cosmetic sponge
- 1 piece of scrapbook paper
- giant wooden letter
INSTRUCTIONS
NOTES:
Let dry completely between painting steps.
- Make sure the letter is clean and dust free before painting.
- Use a pencil to trace the letter shape onto scrapbook paper of your choice.
- Use scissors to cut out the letter. Hold it next to the wooden one to make sure it will fit correctly before decoupaging.
- Use a 1" flat brush and Americana Matte Decou-Page to adhere the paper to the top of the letter. Let dry.
- Once completely dry, sand the edges to create a perfect smooth fit.
- Use a #12 flat brush and Raw Umber to shade around the edges of the letter.
- Use a 1" flat brush and Thermal Green to paint over the entire top of the letter.
- Position the Personally Yours Between the Lines Solid Stencil to spell out a name of choice. Make sure the name fits before stenciling.
- Load a cosmetic sponge with Yellow Ochre to basecoat the name.
- Use the patterns with the letters and load a new cosmetic sponge with Raw Umber. Pounce on patterns of choice in each letter.


