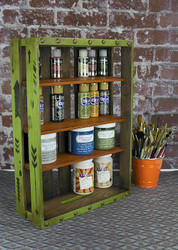
Wall or Standing Storage Crate for Paint
Posted by DecoArt on Dec 31st 2015
This stylish crate organizes DecoArt paint products as a wall or standing unit.
SUPPLIES
- water container
- palette or plastic plate
- paper towels
- sandpaper
- waxing brush
- 3/4" flat brush
- finishing nails
- wood glue
- cosmetic sponge
- hammer
- handsaw
- brads
- scrap wood
- sawtooth hanger
- wooden crate
INSTRUCTIONS
NOTES:
Let dry completely between painting steps.
- Thoroughly sand the wooden crate. (The smoother the surface, the more wood grain will show when painting.)
- Using scrap wood and a handsaw, cut three shelves to fit the inside of the crate.
- With a 3/4" flat brush, brush on Bittersweet in sections of the crate. While it is still wet, wipe away paint with a paper towel or soft cloth to reveal wood grain. (Only paint the inside area of the crate.)
- Paint the outside and handle of the crate in New Life using a 3/4" flat brush.
- Using a cosmetic sponge, randomly paint on arrows from the Americana Array of Arrows Stencil in Carbon.
- With a 3/4" flat brush, apply a coat of Clear Crème Wax to the painted areas.
- With the waxing & finishing brush, apply Deep Brown Crème Wax to the painted areas. (Concentrate on the corners to make them a little darker.)
- Along the top and bottom edge of the crate, hammer in decorative brads.
- Paint all three shelves in Heritage. Let dry. Once dry, coat the shelves with Clear Crème Wax. Repeat with Deep Brown Crème Wax for an aged look.
- Roughly position the shelves to the desired space amounts. (The shelf shown perfectly fits Decou-Page, Chalky Finishes, Americana Acrylics, and Media Fluid Acrylics). Run a bead of wood glue along the back and sides of the shelves and slide into place. Tack with finishing nails for extra hold.
- Optional: Add sawtooth hangers for wall hanging.


