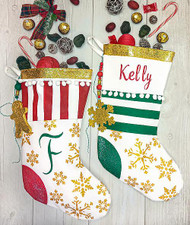
Personalized Holiday Stocking Pair
Posted by DecoArt on Nov 11th 2020
Personalize this staple of holiday décor with SoSoft® Fabric Paint.
SUPPLIES
- transfer paper
- painter's tape
- cardboard
- craft glue
- cosmetic foam wedge
- pen or pencil
- pompon trim
- medium flat brush
- baker's twine
- Cricut machine
- canvas stockings
- wood ornaments
INSTRUCTIONS
NOTES:
Create a stencil for the snowflakes using a Cricut machine or print off the provided pattern and transfer using transfer paper.
- Gather the supplies.
- Place cardboard or freezer paper inside the stocking so the paint does not seep through. Using a medium flat brush, paint a circular shape on the heel of the stocking with Christmas Green. (See photo.)
- Use painter's tape to mask off horizontal stripes. Paint in the stripes with Christmas Green and a medium flat brush. Once done, remove the tape.
- Mask off the top part of the stocking with painter's tape. Use a medium flat brush to paint a stripe in Gold (Metallic). Once done, remove the tape.
- Use a medium flat brush to paint the Gold (Metallic) stripe with Gold Glitz (Glitter). Let dry.
- Use the Sophisticated Stencil on a Ring alphabet stencil to spell out the name. Use a cosmetic sponge to apply Santa Red through the stencil.
- Continue the stenciling process on the lower part of the stocking: using either a Cricut snowflake stencil or transfer the pattern using transfer paper and a pen/pencil, fill in the stencil or paint on the snowflakes in Glorious Gold (Metallic).
- Use craft glue to adhere the pompon trim. (Refer to photo for placement)
- Use a medium flat brush to paint wooden beads and spools using Americana Acrylics in Festive Green, Santa Red, and Antique Gold. Let dry and, using a medium flat brush, apply Gold Shooting Star to the spools.
- Create an embellishment for the stocking by stringing beads onto baker's twine. Adhere to back of an ornament with craft glue.
- Tie the embellishment to the loop of the stocking.
- For the red stocking, follow the same basic instructions. (Refer to this photo for placement.)


