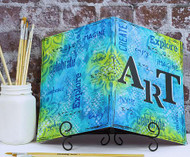
Personal Art Journal Cover
Posted by DecoArt on Jun 25th 2015
Finish an art journal perfectly with a fun cover using stencils and DecoArt Media products.
SUPPLIES
- water container
- palette or plastic plate
- paper towels
- 3/4" flat brush
- 1/4" flat brush
- baby wipes
- black ink pad
- cosmetic sponge
- low-tack painter's tape
- journal book with watercolor pages
- old credit card
- stamps
INSTRUCTIONS
NOTES:
Let dry completely between painting steps.
Stenciling: Load paint onto a cosmetic sponge, pounce off excess on a palette then lightly pounce through the stencil openings.
Blending Colors: Apply paint with folded baby wipe by rubbing lightly in a circular motion, fading the edges as to not leave a hard line.
Glazing: Load paint onto a folded baby wipe and apply by rubbing lightly in a circular motion.
- Apply Gesso to both front and back cover. Allow to dry completely. Tear small unevenly shaped pieces from the text sheet in the Vintage Silhouette Decou-page Paper. Apply Matte Medium to the surface, place a piece of paper down and immediately top with another coat of Matte Medium. Repeat for each piece of paper, randomly placing them on the cover yet leaving several empty areas.
- Use Cerulean Blue to stencil randomly placed portions of the Mandala and Distressed Harlequin stencils.
- One way to seamlessly blend areas of color to use a "wet over dry" technique. Begin by loading Green Gold onto a folded baby wipe. Apply by rubbing lightly in a circular motion, fading the edges.
- Apply Cobalt Teal Hue around the previously applied color using the same method. Be sure to overlap the previously applied color and soften the outer edges.
- Fill in any remaining areas with Primary Cyan using the same method.
- Stencil Translucent White in random areas using Shedded stencil. Overlapping previously stenciled images will strengthen the layered effect.
- Isolate the letters A, R, T from the A to Z stencil by placing painter's tape over the openings around letter. Place each letter to spell the word "art" on the cover and stencil with White Gesso.
- For the "bump" stenciling technique, replace the stencil over the dry completed image and move it slightly to the left.
- Stencil the image again using Black Gesso. This will create more dimension in the image.
- Create another layer by stenciling randomly placed words from the Inspiration and Motivation stencil with Primary Cyan.
- Using a permanent ink pad, randomly stamp the image of birds from the Nature stamp randomly. Slide the edge of an old credit card lightly through a puddle of Black Gesso. Drag the edge along the surface leaving uneven lines in the corners. Create a wash by diluting Black Gesso with water. Load a stiff bristle brush and lightly spatter black over the covers. A thin wash of Black Gesso will create tiny spatters, while a thicker wash will create larger drops.
- Apply two coats of Ultra Matte Varnish on both covers to protect your work and increase durability.


