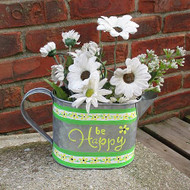
Springtime Watering Can
Posted by DecoArt on Apr 22nd 2019
Turn a plain watering can into a planter for spring flowers with Americana® Multi-Surface Acrylics.
SUPPLIES
- water container
- palette or plastic plate
- paper towels
- rubbing alcohol
- painter's tape
- cosmetic sponges
- metal watering can
- cotton swabs
- paintbrushes
INSTRUCTIONS
- Use painter's tape to tape off the middle section of the watering can.
- Paint Cotton Ball stripes on either side of the painter's tape.
- Add Apple Green stripes on either side of the Cotton Ball stripes. (Do this free-hand or use painter's tape to mark them off.)
- Add small flowers along the Cotton Ball stripe using Lemon Zest.
- Add Black Tie dots to the center of each Lemon Zest flower and stems with leaves connecting each flower in Apple Green.
- Apply the "Be Happy" portion of the Inspiration stencil to the center of the can using Lemon Zest: Use a cosmetic sponge and a very small amount of paint to apply the stencil, dabbing some of it off of the sponge before applying it to the can to ensure a nice clean application and a very thin layer. Build up the layers until the proper coverage is achieved.


