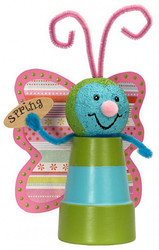
Touch of Spring Butterfly
Posted by DecoArt on Feb 29th 2016
This butterfly, made from a clay pot and Patio Paint Outdoor™, is a great springtime project for kids.
SUPPLIES
- water container
- palette or plastic plate
- paper towels
- tracing paper
- transfer paper
- scissors
- pencil
- craft glue
- #0 liner brush
- #12 flat brush
- black permanent marker
- terra cotta pot
- cardstock
- scrapbook paper of your choice (We used Primrose Pinafore by Ally's Wonderland.)
- small oval
- mini pompom
- chenille stems
- Styrofoam ball
INSTRUCTIONS
NOTES:
Let dry completely between painting steps.
- Trace and transfer the wing pattern onto the cardstock and scrapbook paper. Use scissors to cut out shapes. Set aside.
- Divide and mark the pot into thirds. Use a #12 flat brush and Citrus Green to paint the top and bottom sections. Paint the center section Blue Bahama.
- Use a #12 flat brush and Blue Bahama to paint a heart shape for the face on the Styrofoam ball. Paint the remainder of the ball Citrus Green.
- Use a black permanent marker to write "Spring" on the oval.
- To assemble: Push the head down on the body to flatten "neck" area. Secure with craft glue. Wrap a turquoise chenille stem around the neck to form the arms. Curl the ends to form "hands". Position and adhere the scrapbook wings onto the cardstock wings. Crease the wings in the center. Run a bead of glue down the crease.
- Position and adhere on the body and head. Bend a pink chenille stem in half. Curl the ends to form antennae. Push into the head. Position and adhere on the pompon nose and "Spring" sign.
- Use the handle end of a paintbrush and Wrought Iron Black to dot on the eyes.
- Use a liner brush and Wrought Iron Black to paint the mouth.

