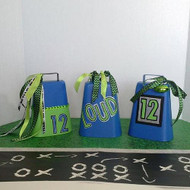
Team Spirit Cowbells
Posted by DecoArt on Sep 20th 2015
Cheer on your favorite football team with customized cowbells using Americana® Multi-Surface Acrylics.
SUPPLIES
- water container
- palette or plastic plate
- paper towels
- rubbing alcohol
- scissors
- painter's tape
- 1" flat brush
- liner brush
- 1/4" flat brush
- 1/2" brush
- ribbon
- permanent marker
- E6000 Glue
- alphabet sticker
- cowbells
- number sticker
- rhinestone chain
INSTRUCTIONS
NOTES:
Let dry completely between painting steps.
- Clean the cowbells using a paper towel and rubbing alcohol.
- For the first bell, paint the front Apple Green. Apply coats as desired, allowing the paint to dry completely between coats. Once completely cured, apply a vinyl number sticker or stickers of your choice in the middle of the bell, using 2" numbers.
- Paint the entire bell True Blue. Allow the paint to dry completely between coats and to cure completely before continuing.
- Using the painter's tape, create a frame around the numbers. Paint the inside of the frame in Silver (Metallic). When partially dry, remove the numbers and the painter's tape.
- Create another border around the Silver using the painter's tape. Paint this border in Black Tie using a 1/4" flat brush and liner brush.
- Outline around the numbers with a black permanent marker. Attach a football with a thin ribbon to the right side of the handle. Create a bow from the larger ribbon and tie onto the right side of the handle.
- For the second bell, paint the front using Apple Green. Allow the paint to cure. Apply 2" vinyl stickers spelling the word of your choice on a diagonal, such as "loud".
- Paint the entire bell in True Blue. When partially dry, remove the letter stickers.
- Outline the letters using a silver permanent marker. Once dry, outline between the Apple Green and the silver with a black permanent marker.
- Cut 8" each of two different ribbons. Repeat so there is enough to go across the top of the handle. Alternate ribbons when tying on.
- For the last bell, paint the front top and back lower area of the bell with True Blue. Apply a vinyl number of choice in the lower right corner of the back.
- Apply painter's tape around the middle of the bell. Paint the lower front half and the upper back half in Apple Green. (See photo for placement.) When partially dry, remove the numbers.
- Using a silver permanent marker, outline the numbers. Outline the numbers again, with black permanent marker.
- Apply a string of rhinestones around the center of the bell using E6000 Glue. Cut several pieces of ribbon in different lengths. Tie and knot them on the left side of the handle.


