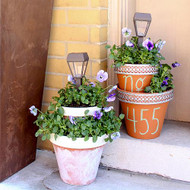
Solar Light and Flower Pot Centerpiece
Posted by DecoArt on May 9th 2016
This flower pot centerpiece created with Americana® Multi-Surface Acrylics can also be a clever address plate.
SUPPLIES
- pencil
- painter's tape
- 6" terra cotta pot
- large flat brush
- clothespins
- 8" terra cotta saucer
- E6000 Glue
- chip brush
- metal ribbon
- solar light
- potting soil
- live plants
INSTRUCTIONS
NOTES:
Let dry completely between painting steps.
- For a rustic or weathered-looking centerpiece, use a chip brush to apply Vanilla Shake in an "X" pattern across the bottom portion of the clay pots. Run the brush through the paint to drag it further. Let dry.
- Once the paint has dried, apply painter's tape below the pots' upper rims. Cover the upper rims with Vanilla Shake.
- For a centerpiece that you can use by your front door, use a pencil to write "No." on the smaller pot and your address numbers on the larger pot. Use a round brush to paint over the pencil marks in Cactus.
- Cut metal ribbon to fit around the pot rims and adhere it to the pots with E6000 Glue. (Use clothespins to hold the ribbon in place while the glue dries. Remove the clothespins once the glue has dried.)
- Fill the larger pot with potting soil. Set the smaller pot inside, and poke the solar path light through the hole in the smaller pot so that it is planted into the larger pot. You can center the smaller pot inside of the larger pot or off-set it to the side.
- Fill the smaller pot with potting soil; add flowers of your choice to both pots.


