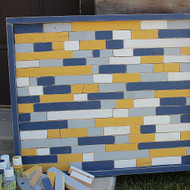
Outdoor Scrap Wood Art
Posted by DecoArt on Feb 16th 2016
Recycle pieces of scrap wood into a colorful mosaic to decorate an outdoor space.
SUPPLIES
- water container
- paper towels
- sandpaper
- ruler
- pencil
- saw
- staple gun
- wood glue
- plywood board, in dimension of your choice
- 1" sponge brush
- wooden board
- hanging hooks
- heavy objects
INSTRUCTIONS
NOTES:
Let dry completely between painting steps.
- Paint the scrap wood in Grey Skies, Cloud White, Sunshine Yellow, and Summer Sky Blue. (For this project, approximately 12 wood scraps about 12" long were used.) Paint each color on three pieces (only on the top). Let dry.
- Once dry, cut each strip of wood with a table saw. (For this project, the table saw was set at 1-5/32".) Be sure to use a consistent measurement throughout the project. Do not change the measurement until you are certain you are finished using the table saw. (Refer to photo.)
- Take the longer strips from the previous step and cut those at random with the miter saw, leaving some long, medium, and short pieces. (This can also be done on the table saw, but a miter saw may be quicker and easier.)
- Sand the edges of each block, as desired.
- Start creating the art (no glue just yet). Set the blocks next to each other to form a bottom row and then continue above that. Continue until a desired look is achieved. (Make color swaps if needed with similar-sized pieces. The total size is about 22" x 19".)
- Cut off the blocks on the end that hang over to create a straight edge. (For the smaller pieces, you can use a larger piece from the same row. Mark it to the amount that needs to be cut off, replace it, and then scoot everything over to align the edge.)
- Cut the plywood board backing to be the same size as the wood blocks (22" x 19").
- Starting with the bottom row, glue each wood piece onto the backing. (It may move around a little bit, so be careful to keep checking that the edge of the backing and the blocks are lined up.) Glue until all the blocks are glued to the backing.
- Place heavy items on the top. Let the project rest at least overnight.
- The next day, remove the weights and begin to frame out the art. Measure the dimension of the work, plus the thickness of the material you are using. (A 1" x 2" piece of wood was used, so it measured two pieces 22-3/4" and two pieces 19-3/4".) Once cut, paint the wood pieces Summer Sky Blue and distress. Glue and staple together into the frame.
- To seal the exposed wood, apply a coat of Clear Coat to the entire surface.
- Apply a hanging device of choice. (A D-ring hook is suggested.) Be sure to drill into a solid piece of wood and not a crack between the wood blocks.


