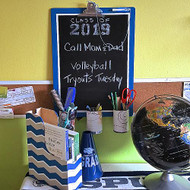
Back-to-School Chalkboard and Book Organizer
Posted by DecoArt on Sep 22nd 2015
This chalkboard and containers, holding everything from messages to highlighters, will get you an A in organization.
SUPPLIES
- water container
- palette or plastic plate
- paper towels
- sandpaper
- scissors
- ruler
- painter's tape
- 2" flat brush
- 1" flat brush
- chalk
- craft knife
- magazine organizer
- clipboard
- assorted scrapbook paper
- electric drill
- twine
- screws
- aluminum can
INSTRUCTIONS
NOTES:
Let dry completely between painting steps.
- Clean or sand all the surfaces. Wipe away any dust or dirt.
- Place painter's tape along the rim of the clipboard. (Be sure to press the tape firmly along the edges to create crisp lines.)
- Using a 2" flat brush, apply Americana Black Chalkboard Paint inside the taped border in one direction. Let dry completely. Apply a second coat going the opposite direction to create cross-hatching. While the paint is still wet, remove the painter's tape.
- Create a 1" border along the sides of the clipboard with painter's tape. If needed, trim tape to form a crisp 90-degree angle using a craft knife. Using a 1" flat brush, paint two coats of Legacy, allowing the paint to dry completely between coats. Remove the tape while the paint is still wet.
- Create a 1/4" border next to the first section; paint the area with Everlasting; and remove the tape.
- For added protection, apply Ultra-Matte Varnish to the border, using tape for straight edges.
- Cut scrapbook paper to fit the aluminum cans. Brush the outside of the cans and the back of the paper with Americana Matte Decou-Page. Adhere the paper to the can, smoothing out any wrinkles with a finger. Apply another coat of Decou-Page on top of the paper.
- Punch or drill one hole approximately 1" from the top of each can.
- Drill three small holes, equally spaced, near the bottom of the clipboard. Attach cans using screws and nuts in coordinating sizes with holes.
- Adhere chalk on the top right hand corner of the clipboard. Tie twine around the chalk, place in hole at top, and tie the other end to large clip. To condition the chalkboard, rub the side of the chalk over the entire surface and wipe off with wet paper towel.
- Paint the wooden magazine organizer in Primitive.
- Adhere the chevron painter's tape to the sides of the organizer in stripes.
- Paint the areas between the tape in Legacy. Carefully remove the tape while the paint is still wet.
- Re-use or apply new tape creating a 1/4" area above the first design. Paint in Everlasting. While the paint is still wet, remove the tape.
- For added protection, apply a coat of Ultra-Matte Varnish to the organizer.


