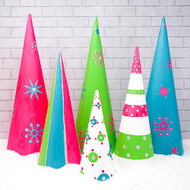
Colorfully Retro Christmas Trees
Posted by DecoArt on Dec 17th 2019
Add vibrant color and fun shapes to Christmas decor with retro holiday trees made with Americana® Multi-Surface Acrylics.
SUPPLIES
- water container
- palette or plastic plate
- paper towels
- paintbrush
- pencil
- Ultra Fine Writer Tip
- 10.6" papier-mâché cone
- 7" papier-mâché cone
- 4" papier-mâché cone
INSTRUCTIONS
- Basecoat all six cones in White Birch
- Paint a 10.6" cone with Pink (Neon). Let dry. Once dry, paint in retro mod designs with Deep Turquoise. Allow to dry thoroughly before accenting with Silver (Metallic) dots. (Use the handle end of the paintbrush.)
- Paint a 10.6" cone with Apple Green. Let dry. Once dry, paint in retro mod designs with Pink (Neon). Allow to dry thoroughly before accenting with Silver (Metallic) dots. (Use the handle end of the paintbrush.)
- Paint a 10.6" cone with Deep Turquoise. Let dry. Once dry, paint in retro mod designs with Pink (Neon). Allow to dry thoroughly before accenting with Silver (Metallic) dots. (Use the handle end of the paintbrush.)
- Divide and mark with pencil one of the 7" cones into six equal sections. Alternating colors, paint in sections with Deep Turquoise, Apple Green, and Pink (Neon). (Each color should have two sections.) Once dry, add stripes between colors using DecoArt Ultra Fine Writer.
- For the other 7" cone, sketch out horizontal stripes in an even number. Using Apple Green and Pink (Neon) paint in striped sections. Once it has thoroughly dried, add polka dots in using the end of a paintbrush or the DecoArt Ultra Fine Writer.
- Add polka dots using Apple Green and Deep Turquoise. Once the polka dots have thoroughly dried, add accent dots using Pink (Neon) and the end of a paintbrush. Add Silver (metallic) to the center of the polka dots.


