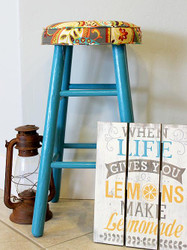
Stool Refinish using Chalky Finish
Posted by DecoArt on May 21st 2015
Take a seat on an updated stool using Americana Chalky Finish that you will fall in love with
SUPPLIES
- water container
- paper towels
- sandpaper
- scissors
- 2" flat brush
- staple gun
- black permanent marker
- needle and thread
- coordinating iron-on bias tape
- trim
- staples
- sewing machine
- fabric
- foam
- cording
INSTRUCTIONS
NOTES:
Let dry completely between painting steps.
- Remove the old fabric and cushion. Be careful not to damage the wood potion of the stool top. Remove all tacks or staples used to hold previous cushion in place.
- Remove foam from package and invert stool on the top of it. Use marker to trace the seat that you will need for the cushion. Trace and cut out.
- Take the cushion that was just cut out and lay it on top of fabric. Trace but leave room for seam allowance. Make the circle a half inch bigger all the way around to allow room for the seam. Cut out.
- Cut a 2-1/2" wide strip that is long enough to go around the circumference of the edge of the cushion.
- For the bias tape, buy a coordinating color or make one out of leftover fabric. To do this, but out 1-3/4" wide strips of fabric on the bias (45 degree angle) as shown. Cut out enough to cover enough cording to go around the circumference of the cushion at least twice.
- Sew bias tape so that it is one continuous length as shown below. There should be a continuous length of bias tape covering.
- With zipper (or piping) foot attachment on sewing machine, sew as pictured with the wrong sides together sandwiching the trim between to make the bias piping.
- Attach the 2-1/2" wide strip to the circle with the bias in between.
- This is what the cushion will look like after sewing.
- Attach the bias piping around the bottom edge as well. Squish the foam inside of the cushion.
- Paint the stool using a 2" brush in Treasure. Optional: paint underneath the seat and/or distress stool with sandpaper.
- Lightly sand entire surface. Using 2" flat brush, apply Soft-Touch Varnish.
- Use a staple gun to attach the cushion. Apply pressure on the stool so that the bottom portion of the bias piping comes up and over the bottom part of the stool. Staple the entire circumference.


