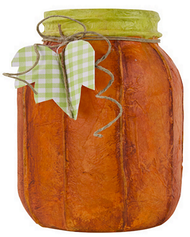
Pretty Pumpkin Tissue Jar
Posted by DecoArt on Sep 9th 2014
Decoupage a storage jar with DecouPage Glue for a unique fall candleholder.
SUPPLIES
- water container
- palette or plastic plate
- paper towels
- scissors
- 3/4" flat brush
- smooth quart-sized Ball® jar
- votive candle or votive with battery
- scrapbook paper or cardstock
- tissue paper in orange and light green
- jute, hemp, string, or yarn
INSTRUCTIONS
NOTES:
Let dry completely between painting steps.
- Tear orange and green tissue paper into small, uneven pieces (about 1").
- Cut jute, hemp, yarn, or string into pieces that fit from jar neck to jar bottom.
- Use DecouPage Matte to adhere jute on jar to form pumpkin sections with 3/4 flat brush.
- Apply DecouPage with 3/4 flat brush on jar in one area at a time. While wet, imbed orange tissue piece. Push tissue to wrinkle a little and then apply more DecouPage. Continue with tissue and DecouPage, overlapping tissue pieces, until jar is covered.
- Repeat Step 4 using light green tissue on jar neck.
- When dry, side-load 3/4 flat brush with Burnt Sienna and use to shade in each side of covered jute.
- Cut leaf shape from scrapbook paper or cardstock. Adhere jute down leaf center. Tie neck of jar with another piece of jute and attach leaf.
- Insert votive candle or votive with battery inside.

