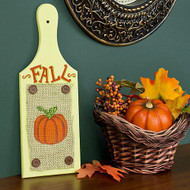
Fall Pumpkin Plaque
Posted by DecoArt on Sep 9th 2015
A wooden plaque with a handle and some burlap add a country accent to a wall or table.
SUPPLIES
- tracing paper
- transfer paper
- sandpaper
- scissors
- ruler
- pencil
- #3 round brush
- burlap
- 3/4" flat brush
- #6 flat brush
- hot glue gun and glue sticks
- medium-sized buttons
- wooden plaque with handle
INSTRUCTIONS
- Use a 3/4" flat brush and Wasabi Green to basecoat the entire plaque. Rinse brush. Let dry completely.
- Use sandpaper to scuff up the edges of the plaque. Repeat as desired.
- Use a pencil and the tracing and transfer papers to trace and transfer the pattern to the top of the board right under the handle.
- Use a #3 round brush with Hauser Light Green to paint the shadows. Rinse brush.
- Use the same brush with Burnt Orange to paint the words and scrolls. Rinse brush.
- Use a pencil and ruler to measure the burlap to 3”x 6”. Cut out the burlap with scissors.
- Use a glue gun to attach the burlap to the plaque just below the word “Fall”. Glue a button to each corner of the burlap.
- Use a #6 flat brush to paint a medium circle in the center of the burlap using Jack-O’-Lantern Orange. Rinse brush.
- Use a #3 round brush to paint the stem and leaf on the circle using Hauser Light Green. Rinse brush.
- Use the same brush with Light Cinnamon to make lines on the pumpkin. Rinse brush.
- Use the same brush with Burnt Orange to shade the pumpkin outline and the area next to Light Cinnamon lines. Rinse brush.
- Use the same brush with Avocado to outline the stem and leaf.

