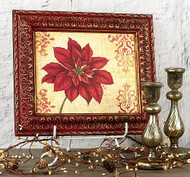
Framed Poinsettia with Scrolls on Masonite
Posted by DecoArt on Oct 31st 2016
This lovely poinsettia with a scrolled background is so easy to create using Americana® Acrylics and Stencils.
SUPPLIES
- palette or plastic plate
- paper towels
- sandpaper
- #3 round brush
- 1/4" flat brush
- scrim or cheesecloth
- #0 liner brush
- sea sponge
- cosmetic sponge
- frame
- 1/2" wash/glaze brush
- grey transfer paper
- small stencil brush
- medium stencil brush
- stamp handle
- Masonite board
- vintage letter stamp
INSTRUCTIONS
- Background: Sand the Masonite board lightly to give it some tooth and wipe with a dampened cheesecloth.
- Basecoat the background with Light Buttermilk. Repeat until the background has a smooth and even application of paint. Let dry.
- Dampen a sea sponge and remove as much water as possible. Load one side of the end with Sand and the other side with Light Buttermilk. Pounce on the palette to remove excess paint, then pounce over the entire background creating a mottled look.
- Place the vintage letter stamp onto a large acrylic handle. Load the cosmetic sponge with Camel and apply it to the stamp, working quickly. Press onto the background. Repeat until the entire background has been covered.
- Mix Country Red with Camel (1:1). Tape the Brocade & Berry Borders Stencil into position in the upper right-hand corner. Load a stencil brush with the mix and apply over the stencil. Allow to dry and apply straight Camel to the tip and Country Red to the top of the stencil. Repeat. (Refer to photo.)
- Transfer the poinsettia design.
- Basecoat the poinsettia with Country Red.
- Dry-brush and float shades with a 3:1 mix of Heritage Brick and Country Red. Apply multiple layers until the application becomes smooth and even. Dry-brush highlights with a 2:1 mix of Coral Blush and Country Red. (Refer to photo.)
- Float Country Red to reclaim the edges that have blended into neighboring petals. Float Rookwood Red to the darkest areas of the petals. Add thin vein lines to each petal with Rookwood Red in the dark areas and Heritage Brick in the remaining areas.
- Using a pulling motion, dry-brush highlights beginning with Country Red in the dark areas of the petal, then moving into a 2:1 mix of Coral Blush and Country Red in the mid-tone areas, and Coral Blush to the lightest areas.
- Wash over the entire flower with Red Alert.
- Float additional highlights with Antique Gold. Add a coat of DuraClear Matte Varnish to the right petals and the edge of the board.
- Center blossoms: Wash over the negative space between the petals with Avocado.
- Pull lines and then dots with Plantation Pine to begin the center blossom.
- Using a #3 round brush, tap Light Avocado in the center of the dots.
- Tap Antique Gold using the tip of a small round brush
- Tap Light Buttermilk using the tip of a liner brush
- Base the stems in Light Avocado.
- Using the small stencil brush, dry-brush a 1:1 mix of Light Avocado and Antique Gold in the center of the stem.
- Float to shade with Avocado.
- Add second highlights with Light Avocado plus a touch of Light Buttermilk. Float the second shade on the left side with Plantation Pine.
- Finishing: Allow to cure 24 hours and apply DuraClear Matte Varnish to protect the painting.
- Frame: Completely wash the frame and allow to dry. Basecoat with Romance. Add a second coat if necessary.
- Thin Burnt Umber with water. Wash over the entire frame, then wipe off the raised areas with a paper towel.
- Using a finger, rub on Gold Rush over the raised areas of the frame. Let dry.
- Frame the painted piece.


