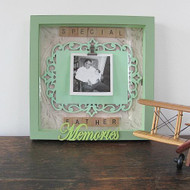
Elegant Photo Shadow Box for Dad
Posted by DecoArt on May 10th 2016
Make a memorable frame for Dad using Americana® Multi-Surface Acrylics.
SUPPLIES
- sandpaper
- painter's tape
- large flat brush
- assorted scrapbook paper
- cosmetic sponges
- wooden plaque
- frame
- spray adhesive
- wooden shapes
- E6000 Glue
- laser-cut shape
INSTRUCTIONS
NOTES:
Let dry completely between painting steps.
- Remove the glass insert from the shadowbox frame. Lightly sand any rough areas. Paint the outside of the shadow box in Cactus with a large flat brush. Let dry. Once dry, lightly sand the edges.
- Place the Distressed Harlequin stencil on the outside of the frame, holding firmly in place with fingers or painter's tape. Use a cosmetic sponge to apply Inch Worm until the entire outside of the frame is covered. Let dry. Once dry, sand very lightly.
- Paint the laser-cut plaque with one coat of Soft Jade. Let dry, then lightly sand around the edges.
- Use a small artist's brush to paint a laser-cut word in Inch Worm. Let dry, then lightly sand around the edges.
- Cut scrapbook paper to fit the inside backing of the shadow box. Lightly cover the back side of the paper with spray adhesive. Quickly apply to the inside of the backing. Smooth out any wrinkles with fingers.
- Apply a thin and even coat of E6000 Glue to the back side of the wooden plaque. Quickly apply to the scrapbook-covered backing. Apply E6000 Glue to the metal clip, laser-cut word, and wooden letters in front of the frame and apply onto the surface. (Refer to main project image for placement.) Let dry.
- Once dry, insert the glass and backing.

