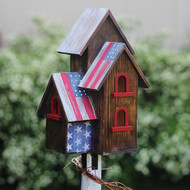
Standing Patriotic Birdhouse
Posted by DecoArt on Aug 25th 2016
Let backyard birds live in the red, white, and blue, in a birdhouse made with Americana® Acrylics.
SUPPLIES
- sandpaper
- pencil
- flat brush
- painter's tape
- wooden birdhouse
- assorted scrapbook paper
- drill and small drill bit
- screws
- garland
- wood stain
- wood boards
- eye hook
- round brush
- bracket
INSTRUCTIONS
NOTES:
You can pick any wooden birdhouse for this project. Just make sure that the stair railing used is thick enough to support it and that the base is wide enough to keep it from tipping over.
- Coat the birdhouse with a dark stain of your choice. Make sure to get all areas, including under the roof eaves. Allow to dry according to label instructions.
- Cut scrapbook paper in a patriotic design to fit two of the sides of the birdhouse. (You don't want to cover the whole birdhouse, making sure there is plenty of variety of textures.) Use Outdoor Decou-Page to apply and protect the outer surface of the paper.
- Use White Wash to cover the roofs of the birdhouse. (Make sure to coat it lightly so that it looks naturally weathered.)
- Use Cherry Red to paint any stand-out features of the birdhouse, such as windows and doors.
- Depending how many roof lines the birdhouse has, choose a couple on which to sketch and paint American flags. Paint slightly rough Cherry Red lines down the roof line, leaving a space for the Deep Midnight Blue patch and stars.
- Fill in the rectangular part of the flag with Deep Midnight Blue.
- Use the bottom of a paintbrush to apply dots for the stars, using White Wash. (You can make these as neat or as crazy as you want.) Let dry.
- Once the paint has dried, use sandpaper to rough up the flags and the other roof lines a little more.
- Paint or stain the stair railing and base of the birdhouse stand with the same wood stain used for the birdhouse. Pre-drill holes for the L-brackets with a drill with the brackets flush with the top of the rail. Apply one to each side of the stair railing or post you will be using.
- Use the screws that came with the L-brackets, or 3/4" screws, to attach the L-brackets.
- With the help of another person, line up the birdhouse bottom with the L-brackets and screw them into the base of the birdhouse.
- Pre-drill three holes in the base of the birdhouse stand.
- Drill through the base into the bottom of the rail, using three screws to give the stand strength.
- Paint the base of the birdhouse stand with Cherry Red, and the rail post with White Wash. (Do not coat everything perfectly. This will save sanding time because you will sand it down after the paint dries anyway. It should look weathered. Also, I used painter's tape to keep the Cherry Red from getting on the post. )
- Coat the entire birdhouse and stand using Matte Spray Finish to give it added protection. (This step isn't necessary if the birdhouse will be displayed inside.) Apply two eye hooks, one each at the top and bottom of the post, to attach a grapevine to, wrapping it around the post in a decorative way.
- The birdhouse post looks especially cute displayed on a porch, or you can buy a working birdhouse for the project and put it in your yard for the birds.


