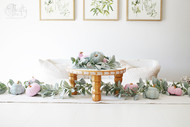
Pastel and Gold Fall Tablescape
Posted by DecoArt on Oct 20th 2019
As you know, most pumpkins in the stores come in the traditional colors still, but it's so easy to change them up. I have painted pumpkins for years and hated it every time until I found this little trick. The best way and quickest way to paint them is by using Americana Decor Chalky Finish paint. It's amazing how this stuff adheres to the pumpkins, prevents bleeding and usually only takes one coat! Plus, it dries quickly!
Items Needed:
- Americana Decor Chalky Finish Paint 8oz - Reminisce (ADC30-36)
- Americana Decor Metallics 8oz - Old Gold (ADMTL11-36)
- Americana Stencils 12x12 - Array of Arrows (ASMM27-K)
- 4 Wood Legs
- Round Wood Top (10-12 Inch Diameter)
- Measuring Tape
- Drill
Instructions:

My pumpkins came from the craft store in a bag. These ones are a little prettier than most with the gold dusting, but not much for my style.

Step 1: To start, I took off all the stems. This will make painting both the pumpkins and the stems a lot easier.

Step 2: To create the soft pink, I combined 4 parts Everlasting to 1 part Reminisce.

I then brushed it on half the pumpkins. Once the first coat dried, I brushed on an additional coat.

I did the same with the other half the pumpkins in Vintage, a beautiful sea green bluish-grey.
Step 3: I then took the Old Gold and lightly brushed it on the pumpkins, focusing along the creases.

Before it dried, I quickly wiped the Old Gold away with a paper towel leaving a little residue left in the creases. This gave it just a little twinkle of metallic gold.

Step 4: I painted the stems with the Old Gold using a sponge brush. Once they were all dried, I placed them onto the pumpkins.

Next is making the tray or stand! I found these legs at the hardware store.

This 12" circle was also bought from the hardware store. They come in many styles and shapes.

To add a little extra character to the stand, I used the Americana stencil "Array of Arrows."

Step 1: Paint all the pieces. I painted the top of the stand with two coats of Everlasting Chalky Finish. I painted the feet with Americana Decor Metallics Old Gold and also painted the edge of the top with it.

Step 2: I then cut out one of the arrow stencils. Using a stippling brush and the Everlasting, I went along the edges of the top and stenciled on the arrow.

Step 3: When everything was dried, I added the feet to the back. To start, I created a square 3" in from each side of the circle on the back. In each corner, I marked where to drill.

I then used a drill bit just a tad bit smaller than the bolts on the legs, and drilled into the wood about halfway on each mark.

I then screwed in the legs, and set the table!

The stems of the pumpkins being the same metallic color as the legs on the stand make this bold stand work with the soft hues.


I added the lambs ear faux greenery to complete the look. The piece on top of the stand is a wreath!


I think it’s fun to get away from the traditional and try something new!

