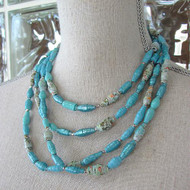
Paper Bead Necklace and Bracelet Set
Posted by DecoArt on Feb 11th 2016
Make a paper bead necklace and bracelet set in a color palette of your choice.
SUPPLIES
- water container
- palette or plastic plate
- paper towels
- scissors
- 1/4" flat brush
- craft glue
- jewelry pliers
- Styrofoam sheet
- beads
- wooden skewer
- wire cutters
- paper trimmer
- crimp bead
- jewelry clasp
- magazine
- beading wire
- crimping tool
INSTRUCTIONS
NOTES:
Be sure the beads are totally dry before stringing.
Let dry completely between painting steps.
- Use a paper trimmer to cut strips from magazine pages. (You can also use junk mail or scrapbook paper.)
- Cut strips the length of the magazine pages about 1" wide. Using a paper trimmer, cut each strip into two long triangles. Cut a variety of widths for added interest. (The beads can also be made from long narrow strips, not cut into triangles.)
- Roll the widest end of strip around a wooden skewer. Keep wrapping the paper around the skewer, being sure to wind evenly and fairly tautly. Every few turns, add a small dab of craft glue.
- Keep winding and adding dabs of glue until you reach the end of the paper strip. Add a dab of glue to the end.
- Let the glue dry before proceeding.
- Paint the beads on skewers using two coats of paint. (We used a blue palette of Desert Turquoise, Coastal Waters, Turquoise Waters, and Peacock Pearl.) Stick the skewers into a sheet of Styrofoam while drying. (For interest on some of the beads, use two different colors, dabbing a bit of the second color on top of the dry first coat of color.)
- Let dry, then brush each bead with Triple Thick Gloss Glaze. Let dry on the skewers.
- Determine the desired length of necklace. Cut beading wire with wire cutters or sharp scissors, being sure to add at least 3" extra.
- String the wire through one crimp bead and then the necklace clasp (toggle-style closure).
- Bring the end of bead wire back through the crimp bead.
- Pull the wire taut with pliers.
- Using a crimping tool, flatten the crimp bead. Cut off the excess bead wire.
- String the paper beads, alternating with small accent beads. For the other end of the closure, repeat Steps 9-12 using a crimp bead and the other end of the toggle closure.
- Necklace can be doubled over, or used as a bracelet by winding it around the wrist. (See photo: Two long necklaces are shown, below, worn together.)


