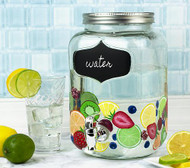
Beverage Dispenser with Painted Fruit
Posted by DecoArt on Oct 28th 2020
Paint this fruity dispenser with DecoArt® Glass Paint for your next family gathering.
SUPPLIES
- water container
- palette or plastic plate
- paper towels
- painter's or cellophane tape
- cotton swabs
- rubbing alcohol
- glass beverage dispenser
- toothpick
- #2 round glass paintbrush
- #4 round glass paintbrush
- 5/0 liner glass paintbrush
INSTRUCTIONS
NOTES:
Clean the glass surface with rubbing alcohol or wash in warm soapy water. Rinse and dry well before painting. Follow the paint label instructions for the cure/bake times.
- Print out the provided fruit pattern. Place the printed pattern inside the canister. (See photo.) Secure with tape.
- Base the colors on the citrus fruit slices, using a #4 round glass paintbrush to pounce the mix, creating the desired shape: LIME: use mix of White, Green, and Yellow; ORANGE: use mix of White and Orange; and LEMON: use mix of Yellow and White.
- Add details: On the citrus slices, use a liner brush and White to line the segments and paint the pith. Use the same brush to paint the outer skin Green for the lime, Orange for the orange, and Yellow for the lemon.
- Use a #4 round brush to paint the strawberries, Red; the kiwis with a Yellow and Green mix; the blueberries with Navy; and the cherries with Red mixed with a small amount of Navy. Let dry and repeat the basecoats. (Save the remaining cherry mix for STEP 9.) Let dry.
- Highlight the blueberries with a double-loaded #2 round brush of Soft Violet and Navy. (Keep the Soft Violet side toward the outer edge.) Use a liner brush and Soft Violet to paint the star shapes.
- Details for the whole strawberries: Use a liner brush with a Yellow and Brown mix to paint the seeds. Use a liner brush and Brown to shade one side of each seed and White to highlight the opposite side. Use a #2 round brush and Green to paint the leaves. Highlight with Yellow. Details for the strawberry slices: Use a #2 round brush and a Red/White mix to dab in the center. Use a liner brush and White to pull lines from the center to the edge around the berry.
- Kiwi: Add a little White to a Yellow/Green mix. Use a #2 round brush to pounce a center circle. Use a liner brush to pull lines from the center to the edges. Use a liner brush and Brown to dot seeds around the center and to outline the slice.
- Cherry: Use a #2 round brush to shade the cherry with a Blue/Red mix. Highlight with White.
- Blackberry: Use the same cherry mix from STEP 4 and a cotton swab to dot the blackberry shapes. Let dry and then repeat adding a small amount of White. Use a toothpick and White to dot highlights randomly.
- Move the pattern to the other side of the dispenser and repeat the painting steps. For more interest, the pattern can be flipped.


