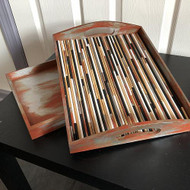
Paint Your Own Serving Tray
Posted by DecoArt on Jun 15th 2021
Paint your own sering tray and trasnform it into an industrual modern style using the Designer Finishes™ Rusted Metal kit.
SUPPLIES
- sandpaper
- scissors
- craft glue
- small flat brush
- 3/4" flat brush
- water
- wooden tray
- wooden dowels
INSTRUCTIONS
NOTES:
I find that, when painting wood, working a drop or two of water into the paint helps it go on smoothly and really be absorbed by the surface. Paint with the grain whenever possible. Use the larger brush to apply paint and the smaller brush to apply the sand mixture.
- Gather the supplies. If needed, lightly sand the trays and dowels with the sandpaper.
- Use the large flat brush to basecoat the entire surface of both trays in Tin from the Designer Finishes kit. (Two coats may be required. Don't forget the edges and handle.)
- Set the smaller tray aside. Mix together Georgia Clay and Texture Sand from the Designer Finishes kit in a 1:1 ratio and apply, using the smaller flat brush, to the sides, inside and out, of the large tray. (Apply randomly, focusing on the corners and edges for a natural look.) Allow to dry completely.
- Mix Asphaltum from the Designer Finishes Kit with water at a 4:1 ratio and, with the small flat brush, apply over Georgia Clay/Texture Sand mix. Using a brush, scrub the paint into the dried Texture Sand to create dimension. Let dry.
- While the tray dries, separate the dowels into four groups. In each group, leave several full length, but cut the rest into smaller pieces of random lengths. (I found that I could score the rods with the scissors and then break them by hand and sand the ends smooth.)
- Use the large flat paint brush to paint the dowels in one group with Lamp Black. Paint the second group with Snow White. Use the small flat brush to paint the third group with all steps of the Designer Finishes kit, as you did the tray. For the last group, apply Asphaltum/water mix to the dowels, to enhance the natural wood. (See photo.)
- Put down a line of glue on the surface of the tray and place each dowel. (I found it easiest to start with larger dowels and place smaller dowels around them to fill the space. You will need to measure and cut some of the dowels to fit.) Fill the entire flat surface with dowels. Avoid placing dowels of the same color next to one another. Continue adding painted dowels on the tray until it is completely filled.
- Complete the smaller tray by applying the remaining steps of the Designer Finishes kit as you did with the larger tray. Display the trays together to complement each other.


