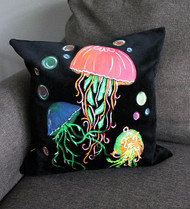
Neon Jellyfish Velvet Pillow
Posted by DecoArt on Jul 10th 2019
Create a bright pop of color with a velvet pillowcase and Americana® Multi-Surface Acrylics.
SUPPLIES
- round object for tracing
- throw pillow
- small round detail brush
- wooden board
- binder clip
- chalk marker
- medium and small flat brush
INSTRUCTIONS
NOTES:
Watch the direction of the velvet and paint with the grain, as the paint will go on smoother and more evenly.
- Stretch or press any wrinkles out of the velvet pillow cover.
- Insert a wooden board into the pillow cover opening.
- Wrap the velvet cover around the board, making sure to center the board, as this will be the hard surface to paint on. Pull taut and clip into place on all four corners with binder clips.
- Using a chalk marker, sketch out three different shapes of any kind resembling a jellyfish, one each in small, medium, and large sizes. Draw several circles in different sizes for bubbles. (You can use lids, buttons, or something similar as patterns to trace.)
- Begin filling in the shapes using the neon Americana Multi-Surface Acrylic colors listed. Overlap colors to make the jellyfish appear to be a little transparent. Paint lots of shapes as tentacles. (No shape or color is wrong. Each has its own fun look.)
- Add in more layers of paint as the paint will soak in and dry very light.
- Apply some of the paint much thicker in the areas where you'd like for it to appear bolder and larger, or on places where you want to show ridges or lines.
- While the fourth layer of paint is drying, use multiple colors of neon paint on a medium flat brush and begin forming the colorful bubbles.
- After the fifth layer of paint has been added to the jellyfish and the bubbles are full of color, allow to dry completely.
- Look for places where you would the pillow to glow in the dark. Using Cotton Ball and a small detail brush, go back and paint white highlights on the jellyfish as well as on the bubbles. Let dry.
- After the Cotton Ball has dried, go back over all those areas first with Cotton Ball and then with Glow-in-the-Dark Paint. Allow to dry completely between the layer of Cotton Ball and Glow-in-the-Dark Paint.


