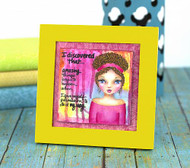
"My Way Marie" Framed Art
Posted by DecoArt on Jan 12th 2016
Frame some inspiration for yourself or someone dear with DecoArt Media® Fluid Acrylics.
SUPPLIES
- water container
- palette or plastic plate
- paper towels
- tracing paper
- transfer paper
- scissors
- pencil
- #10 flat brush
- craft glue
- #1 liner brush
- scrapbook paper
- #1 round brush
- letter stamps
- black stamp pad
- frame
- art tile cards
- spray bottle
INSTRUCTIONS
NOTES:
Let dry completely between painting steps.
- Fill an empty spray bottle with water. Spray water onto one of the art tile cards, using enough water to create puddles. Spray Primary Cyan, Primary Yellow, and Primary Magenta Media Misters onto the moistened card. Lightly mist with water again to blend the colors.
- While the Misters are still wet, place a second art tile card on top of the misted card.
- Lift the second card to see the result. (I used a dry card, but if you want an even softer look, lightly moisten the second card before putting it on top of the first card.)
- Use a pencil and the tracing and transfer papers to trace and transfer only the basic outline of the figure onto the card.
- Use a #1 round brush to apply White Gesso over the entire basic shape. Rinse brush. Use the same brush to add a small amount of Quinacridone Gold to the White Tinting Base a little at a time to achieve the skin color you want. (Make enough to use for future steps.) Use the same brush to loosely fill in the face. (It is ok to go past the face a little.) Rinse brush. Let dry completely.
- Once dry, use the pencil and the tracing and transfer papers to trace and transfer the rest of the details from the pattern.
- Mix the flesh mix from step 5 with a touch of Burnt Sienna. Use with the #1 liner brush to shade the recess areas of face and neck: around the eyes; the bottom of the nose; above the upper lip and under the lower lip; under the hair and chin; and on the sides of the head, neck, and shoulders. Rinse brush. (It will look too dark right now but will soften as we go.)
- Use a #1 liner brush with Titanium White to paint areas that protrude: the forehead; under the eyebrows; on the balls of the cheeks; the tip of the nose; above the upper lip; on the bottom of the chin; and across the chest. Use the same brush to base the whites of the eyes with Titanium White. Rinse brush.
- Use the same brush to paint irises of eyes with Titanium White mixed with a small amount of Primary Cyan. Rinse brush. Use the same brush to outline the irises with Primary Cyan. Paint a very sheer glaze of Primary Cyan above the upper eyelids, at the top of the forehead, and on the side of the neck.
- Use a #1 round brush to mix (1) part Burnt Umber with (1) part Titanium White. Use the mix to paint the hair. Rinse brush. Use a #1 liner brush and Carbon Black to paint the pupils of eyes and to line the upper lashes. Rinse brush. Let dry completely. When dry, paint a small wash of Carbon Black across the top of the entire eyeball to set it back into the head. Rinse brush. Highlight the eye with a dot of Titanium White in the pupil at 2 o'clock and a line at 7 o' clock.
- Use the same brush to blush the cheeks with Primary Magenta and a little bit of Titanium White, then basecoat the dress, headband, and lips with the same mix. Place Primary Magenta shading on the sides of the arms; on the dress under the arms; at the outer edges on headband; and on the bottom of the lips. Line the smile with Primary Magenta and then add Carbon Black. Rinse brush. Use the same brush and Titanium White to highlight the lower lip and cheekbones. Rinse brush.
- Use a #1 liner brush and Burnt Umber to line the curls and eyebrows. Rinse brush. Use a #1 round brush to mix a lot of water with Primary Magenta, creating a wash brush across the top. Hold the canvas upright to create drips. Rinse brush. Let dry. Once dry, use the letter stamps with stamp pad to add a quote of choice off to the side. (Refer to photo.)
- Use a #10 flat brush to add several coats of Ultra-Matte Varnish, letting dry in between coats. Rinse brush.
- Use scissors to cut scrapbook paper of choice for a background.
- Use craft glue to attach the art card to the scrapbook paper and place in a frame to hang or sit in any room of your home.


