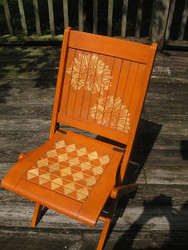
Painted Mum Chair
Posted by DecoArt on Jul 23rd 2014
Turn a plain chair into a pretty mum chair
SUPPLIES
- sandpaper
- scissors
- ruler
- waxing brush
- 1" painter's tape
- craft knife
- sponge pouncer
- low-tack self-adhesive spray
- black and white printed images on self healing laminated sheets
- 9" x 12" self healing laminated sheets
INSTRUCTIONS
- Wipe down chair with damp cloth.
- With one inch brush paint entire chair, excluding hardware, with Heritage Chalk paint. Let dry. Wash brush.
- With fine grit sand paper, sand entire chair. Wipe down with damp cloth. Let dry.
- With a waxing brush, apply a light coat of Clear Creme wax over entire chair. Let dry. Wash brush.
- With a well worn brush apply a light, random coat of Dark Creme wax to entire surface. Let dry. Lightly buff with soft cloth. Wash brush.
- Print art for chair back onto a self sealing laminating sheet. Leave backing on.
- Use a craft knife to cut out design.
- Trim a halo around design. Lightly spray back of design with low tack spray adhesive. Let dry until tacky. Place in position.
- Mix together the Heritage Chalk paint with Lace Chalk paint to create a tonal color of desire.
- With a sponge pouncer, stencil the design with the mixed paint. Let dry. Wash pouncer.
- With the same stencil, determine where the 2nd design will go.
- Since this stencil goes off the edge of the chair's back, mark the art for trimming.
- Use a straight edge and craft knife to trim the stencil.
- Spray the back of stencil with the low tack spray adhesive. Let dry until tacky, and place in position. Use blue tape if necessary to mask off an area that will not be painted. Stencil as in step 11.
- Cover seat of chair with contact paper.
- Print diamond design onto copier paper. Trim design.
- Spray the back of design with the low tack spray adhesive. Let dry until tacky, and place in position.
- Use a craft knife to cut out the diamond design.
- With a rounded stencil pouncer, fill in the open areas with the same mixed color used on the flowers. Let dry. Wash pouncer.
- With a damp, rough wash cloth. gently, but firmly go over the stencils to remove some of the surface. Similar to sanding, but less aggressive. Let dry.
- With a well worn brush, scumble a light, random coat of Golden Creme wax over stenciled surfaces. Let dry.


