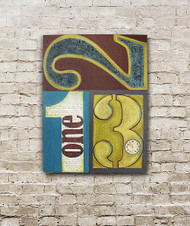
Mixed Media Number Canvas
Posted by DecoArt on Jun 10th 2014
Show your love of numbers with a mixed media creation using DecoArt's newest product line.
SUPPLIES
- water container
- palette or plastic plate
- paper towels
- tracing paper
- transfer paper
- scissors
- pencil
- 1" flat brush
- #2 round brush
- 1/2" flat brush
- yardstick
- clean cloth
- assorted scrapbook paper
- 18" x 24" canvas
- palette knife
- numbers stencil
- picture of a clock face
INSTRUCTIONS
NOTES:
Let dry completely between painting steps.
- Look for fonts you like on the Internet. (I used Bernard MT Condensed for the letters and numbers 2 and 3 and Berlin Sans FB Demi for the 1.) Print out the number 2 to be the same width as the canvas. The 3 will be 1-1/2" shorter than the distance from the bottom of the 2 to the bottom of the canvas. (See photo: It leaves enough room for the 3 to have a 3/4" border around it.) The 1 can just fit in the remaining space to the left of the 3. (Or the 1 would be easy to draw using a yardstick.)
- Draw the rectangles on the canvas once you know the measurements of the numbers.
- Using tracing and transfer papers and a pencil, cut out a rectangle the same size as the space for the 3. (I used a simple polka dot.) Cut out the number 1. (I used handwriting.) Cut out the clock face. (My clock face was on a piece of scrapbook paper, and I printed it out 2-3/4" wide.)
- Using the Matte Medium as an adhesive medium, glue the 1 and the rectangle down with the 1" flat brush.
- Transfer the drawing of the letters onto the third scrapbook paper. (They should be as tall as the width of the 1.) Cut them out and decoupage them down (with the 1/2" flat brush and Matte Medium) onto the 1.
- Transfer down the outline of the 3.
- Use the 1/2" flat brush and a mixture of the Transparent Yellow Iron Oxide and a tiny bit of Titanium White to paint over the scrapbook paper with the 3 on it. (Let the colors mix on the canvas to make a shading effect.) Paint the 3 with Transparent Yellow Iron Oxide.
- Cover the 3 with Clear Crackle Glaze using the 1/2" flat brush.
- Put English Red Oxide Antiquing Cream onto a cloth and rub into the cracks of the 3.
- Wet the cloth slightly and wipe off the excess English Red Oxide Antiquing Cream.
- Decoupage the clock face down using the Matte Medium and the 1/2" flat brush.
- Make a lot of a mixture of a 1:1 of English Red Oxide and Quinacridone Violet. Use this and the #2 round brush to outline the 3. (You can outline your clock too. Mine already had a ring around it the appropriate color.)
- Draw a shape inside the 2 that leaves a 1/2" border all the way around. Use a palette knife and Black Modeling Paste to stencil the number stencil over the center area.
- Rub the Patina Green Antiquing Cream over the numbers. Let dry and then wipe off the excess with a moist cloth.
- Using the #2 round brush, fill in the border of the 2 with Transparent Yellow Iron Oxide. Dip the brush in a touch of Titanium White and shade the area. (Refer to photo.)
- With the mixture of the English Red Oxide and Quinacridone Violet, fill in the space around the 2 with the 1/2" flat brush.
- Mix (4) parts Texture Sand Paste with (1) part Cobalt Turquoise Hue. Stir with a palette knife. Using the 1/2" flat brush, fill in the area around the 1 with the Texture Sand Paste/Cobalt Turquoise Hue mixture. (Pay attention to the direction you drag your brush; this will determine the texture you make. I used long vertical brushstrokes.)
- With the #2 round brush, paint a strip of Dark Grey Value 3 above the Texture Sand Paste and then in the border around the 3.
- Paint the sides of the canvas with the 1" flat brush and Dark Grey Value 3.
- With the #2 round brush, paint accents on all of the numbers and letters with Cobalt Teal. (This adds dimension and interest.) Shade around the edge of the 1 with the #2 round brush and Transparent Yellow Iron Oxide.


