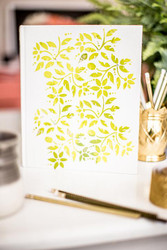
Mixed Media Bullet Journal Cover
Posted by DecoArt on Jun 29th 2017
I'm a girl who loves lists. To do lists to be exact. Something about dumping everything out of my brain and tackling tasks one by one makes me so happy! I'm also a girl who loves to journal/ write things down. Put my pen to paper and the sky's the limit! So when I discovered bullet journaling a few years ago, it was the perfect journaling style for me because basically, I had already been doing it!
If you're not familiar with bullet journaling, it's basically a method of journaling/ note-taking that uses bullet points to mark off tasks. It can be for the person like me who loves to do lists, likes to journal or take notes, or someone who likes to jot down things quickly and keep track of thoughts and ideas! You can learn more here, but today I'm going take you through a simple cover I did for my bullet journal recently using some DecoArt Mixed Media products!
Items Needed:
- DecoArt Media Mediums and Specialty Products - Modeling Paste - White (DMM21-71)
- DecoArt Media Mediums and Specialty Products - Texture Sand Paste (DMM23-71)
- Palette Knife
- Canvas Journal
- Double Sided Tape
Instructions:
I've never used mixed media before so this was a first and let me tell you, I loved it and can't wait to experiment with it again. So if this is your first time creating with any sort of mixed media I'm here to tell you, you got this! If you've done it before then, I hope you like it!
I knew I wanted something a bit natural for the cover of my journal. I spend most of the time journaling in my office flooded by natural light so I thought it would be something pretty to look at while sitting on my desk.
To start use a canvas journal so that the paste adheres.

Use double side tape to stick the stencil onto the journal and press down tightly. Make sure to put the tape on the outsides and also on the insides of the stencil so no sliding occurs.

Next take your paste and apply a good size amount to the paint tray. DecoArt sand texture paste was a bit to rough for this project so I decided to switch to the smoother DecoArt modeling paste! It was so easy to work with!
Simply add a few drops of green fluid acrylic and mix it to your desired color. I started off with a lighter green for the base.

Make sure to use the spatula to spread the paste on to the journal until the entire stencil is full. For a smooth look make sure you smooth the paste out as much as you can!

Then I added a few more drops and darkened the paste. After that I added it to the stencil to make dark and light spots on the stencil.

I waited about 15 minutes to let the paste settle and then slowly removed the stencil from the journal.

Here's a little peek inside one of my journal pages!

For fun I tried DecoArt’s triple thick gloss on this page just to see what it was all about. It's made to give a nice sheen to any type of material that it's applied to while staying
flexible! It did just that! I applied it to the pictures and washi tape and it worked perfectly.


