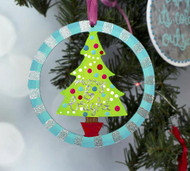
"Merry & Bright" Wreath Tree Ornament
Posted by DecoArt on Nov 25th 2015
Trendy colors of Americana® Multi-Surface Acrylics update this holiday tree ornament.
SUPPLIES
- water container
- palette or plastic plate
- paper towels
- tracing paper
- transfer paper
- scissors
- #6 flat brush
- #1 liner brush
- ribbon
- pen or pencil
- tree wreath ornament
INSTRUCTIONS
NOTES:
Let dry completely between painting steps.
- Use the #6 flat brush and Chartreuse to paint the entire tree. Do not rinse brush. Load the same brush with Apple Green to shade the tree. Rinse brush.
- Use the same brush and Coastal Waters to paint the wreath. Do not rinse brush. Load the same brush with Deep Turquoise to shade the wreath. Rinse brush.
- Use the #6 flat brush and Lipstick to paint the pot that the tree is sitting in. Rinse brush.
- Use the #1 liner brush and Cocoa Bean to paint the tree trunk. Do not rinse brush. Add a very small amount of Cotton Ball to the dirty brush until it is a mix and use to make detail in the bark. Rinse brush.
- Use a pen or pencil and the tracing and transfer papers to trace and transfer the words "merry & bright" to the tree.
- Use the handle end of the #1 liner brush dipped in Cotton Ball to make the garland around the tree. Wipe off the handle.
- Use the handle end of the #1 liner brush dipped in the following colors to add ornaments: Pink Tropics, Lipstick, Coastal Waters, and Deep Turquoise. Rinse brush before switching colors and at the end.
- Use the #1 liner brush and Silver (Metallic) to paint the words "merry and bright". Rinse brush. Use the #6 flat brush and Silver (Metallic) to paint stripes all around the wreath part of the ornament. Rinse brush.
- Use scissors to cut ribbon of your choice.
- Tie the ribbon to the ornament.


