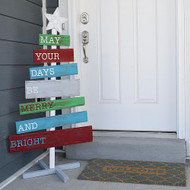
"Merry and Bright" Wooden Slat Christmas Tree
Posted by DecoArt on Aug 25th 2016
Build this merry and bright holiday decoration and color with Americana Decor® Chalky Finish™ paint.
SUPPLIES
- transfer paper
- pencil
- tape measure
- 2" flat brush
- hot glue gun and glue sticks
- wood glue
- 1/8" flat brush
- electric drill
- miter saw
- screws
- plywood
- wire cutters
- wood boards
- tree topper
INSTRUCTIONS
NOTES:
Let dry completely between painting steps.
- Using a miter saw, cut cedar slats into seven pieces, each one a few inches longer than the previous. Estimated lengths: 9.5", 12", 15", 17", 20", 22", and 26".
- Use a 2" flat brush to paint the fronts and sides of each slat with alternating colors: Fortune, Rouge, Treasure, and Yesteryear. Give it a distressed look by brushing on thin layers of paint to let some of the wood show through in streaks.
- Using transfer paper, transfer the words from the provided pattern onto the left side of the slats.
- Use a 1/8" flat brush to paint the words in Everlasting, omitting "Merry" and "Bright". Use Rouge and Treasure to paint the words "Merry" and "Bright". Allow the paint to dry completely between coats.
- Use a miter saw to cut (4) 10" pieces of 2"x 2" pieces of wood for the base of the tree.
- Create the base by laying these pieces flat against each side of the 1" x 2" furring strip. (The furring strip will help measure the size of gap to leave in the middle of the base.)
- Use wood glue to hold the pieces together. When glue has dried, screw the pieces together for extra support.
- Apply a coat of DuraClear Matte Varnish to all surfaces for outdoor use.
- Lay the slats along the trunk of the tree, leaving a gap between each slat and room at the top for the star. With a pencil, mark where each piece will go on the trunk and mark an X where you will drill the holes for the screws. Drill holes in the trunk.
- Set the slats face down and use the marks on the trunk to determine the correct placement. Center each slat. Screw each slat to the trunk.
- Use wire cutters to cut off the base of the tree topper star. Trace the star onto plywood. Cut out the plywood star with a jigsaw or scroll saw. Paint the plywood star with Everlasting. Use a hot glue gun to attach the tree topper to the plywood and the plywood to the top of the tree.
- Slide the tree into the base. Optional: Glue or screw the tree into the base.


DOWNLOADS
May Your Days TextMerry And Bright Text

