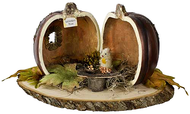
Autumn House Centerpiece
Posted by DecoArt on Nov 24th 2014
This charming house shows that nature can be a great and ceaseless source of mixed media materials.
SUPPLIES
- water container
- palette or plastic plate
- paper towels
- sandpaper
- pencil
- 1" flat brush
- craft glue
- hot glue gun and glue sticks
- wood filler
- 6" foam pumpkin
- wire
- palette knife
- craft or utility knife
- mop brush
- 8" x 10" natural wooden plaque
- natural items
- vine stencil
- decorative mini frames
- small wooden plaque
- small hand drill
INSTRUCTIONS
- Use the craft/utility knife to cut the pumpkin in half.
- Hold a mini frame against the center of each pumpkin half on the outside. Draw a pencil line around it, and use this as a guide to cut out windows with the knife.
- Sand the edges and fill in with wood filler to smooth them.
- Paint the edges of the cut pumpkin Light Buttermilk and the inside stem area by pit-patting with Burnt Umber and Light Buttermilk.
- Carefully hold a portion of the vine stencil in place on the back half of the pumpkin on the outside. With a palette knife, apply Modeling Paste over it to create dimensional leaf patterns. Let dry completely.
- Repeat the vine pattern on the outside of the pumpkin where desired.
- Paint the outside of the pumpkin (except for the stem) with two coats of Copper.
- Double-load the large flat brush with Copper and Lamp Black and use to darken the crevices and around the leaves. Use a mop brush to soften and blend. Let dry.
- Pit-pat the inside of the pumpkin with Canyon Orange, Marigold, Burnt Umber, and Light Buttermilk. Use a mop brush to blend and soften. Let dry.
- Glue the mini frames to the outside to frame the windows.
- Create the inside window frames with large seeds such as gourd or pumpkin seeds.
- Spray lightly with Americana Matte Spray Sealer to preserve.
- Attach the pumpkin to the wooden plaque with hot glue, small nails, or screws.
- Using hot glue and craft glue, make a floor with moss and leaves. (Use natural or silk.) Add acorns, small stones, or pinecones.
- Add purchased miniature furniture and accents or make them. A table can be made from a stick and some bark, and an acorn cap makes a good dish.
- Print the sign in a computer font. (We used Harrington.) Use Americana Matte Decou-Page to decoupage the sign to a small wooden plaque and then drill tiny holes and wire it to the stem.

