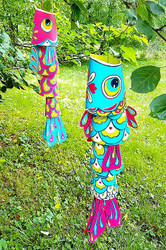
Koinobori-Inspired Colorful Windsock
Posted by DecoArt on Jun 28th 2020
Make these fish body windsocks with Patio Paint Outdoor™.
SUPPLIES
- tracing paper
- sandpaper
- scissors
- X-Acto® knife
- fine/small round brush
- embroidery thread
- medium flat brush
- 1/2" oval brush
- hot glue and hot glue gun
- watercolor paper
- paper mache cones
- wood skewers
INSTRUCTIONS
NOTES:
In Japan, carp represent strength. The Koinobori (carp streamers) are traditionally flown on Children's Day May 5 in Japan and in spring and summer months. Each windsock represents a family member and they are flown to celebrate health and growth for the children. In the following steps, I will be s
Always allow paint layers to dry in between coats unless otherwise noted.
- Use traditional Japanese Koinobori designs for inspiration for the fish patterns. Use the provided patterns to trace on the design or design your own!
- You will need 5 paper mache or cardboard cones. two 17" cones, two 14" cones and one 12" cone.
- Gather other materials.
- First measure cones and mark with a pencil. For the head for Fish 1, measure and mark the 17" cone 6" from the bottom on one side. For Fish 2, measure and mark the 14" cone 4" from the bottom on one side.
- For Fish 2, measure 5" from the bottom on the other side. Connect marks around cone. This will be the mouth for Fish 1. For Fish 2, measure 3.5" from the bottom on the other side. This will be the mouth for Fish 2.
- Using an exacto knife cut along all marked lines.
- Lightly sand cut edges to smooth.
- Continue to measure and cut cones to gradually decrease in size. These shapes will form the bodies for each fish.
- Using patterns: fish 1 and fish 2 face patterns, trace or draw on the pattern for each fish. (You can make it your own by free-hand drawing fish faces and scales.)
- Using the patterns: fish 1 and fish 2 body patterns, draw or trace scales on the body shapes for each fish.
- Using Patio Paint Turkish Teal and a small round brush, begin painting Fish 1 pattern.
- Paint Fish 2 with Hibiscus Pink.
- When dry, add Lime Zest to Fish 1.
- And add Golden Pineapple to Fish 2.
- Keep adding paint to Fish 1 to build pattern. Paint Sandy Shore into the scale pattern as well as Nightfall to outline shapes to add contrast. Finally, paint details with Red Pepper for a pop of color.
- For Fish 2, paint details with Turkish Teal, Sandy Shore and Nightfall.
- Paint the insides of shapes because these do show. Fish 1 paint inside with Lime Zest.
- Fish 2 paint inside with Golden Pineapple.
- Trace or draw fin and tail patterns provided onto watercolor paper. Cut out shapes.
- For Fish 1 tail and fins paint on Turkish Teal. For Fish 2, paint on Hibiscus Pink.
- Continue to build color patterns on each side. For Fish 1, Golden Pineapple and Red Pepper and for Fish 2, Turkish Teal and Golden Pineapple.
- Paint around tail and fin shapes with Nightfall for Fish 1 and Sandy Shore for Fish 2. Add dots and lines for added textures.
- Take wooden skewer or popcycle stick and break or cut to fit all body cones. Hot glue them in the top center of each.
- For the head shapes, glue skewer inside approximately half way.
- Cut a hole into tail shapes and add embroidery thread. Glue tail pieces to a skewer piece for stability.
- Bring thread through the smallest body shape for each fish. Tie a knot in the middle of skewer.
- Add glue to each side of knot so thread will not slip. Continue for each segment until your fishes are all tied together.
- Glue fins other fins onto fishes.
- Hang up your Koinobori in your home or outside on beautiful days to enjoy!


DOWNLOADS
Fish 1 Body PatternFish 1 Face Pattern
Fish 1 Fin Patterns
Fish 1 Tail Pattern
Fish 2 Body Pattern
Fish 2 Face Pattern
Fish 2 Fin Patterns

