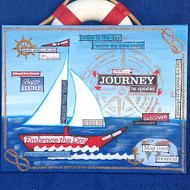
"Journey" in A Sailboat Mixed Media
Posted by DecoArt on Apr 13th 2016
Creating a mixed media wall canvas will be smooth sailing with DecoArt Media® Fluid Acrylics.
SUPPLIES
- water container
- palette or plastic plate
- paper towels
- transfer paper
- scissors
- ruler
- pencil
- painter's tape
- #3 round brush
- 3/4" flat brush
- #8 flat brush
- #0 liner brush
- canvas
- cosmetic sponges
- text
- map
INSTRUCTIONS
NOTES:
Let dry completely between painting steps.
- Using a 3/4" flat brush, apply a coat of White Gesso to the entire front and sides of the canvas; let dry. Using transfer paper, transfer the provided sailboat patterns onto the canvas. For proper placement, trace the boat 2" in from the left side and 2-1/4" up from the bottom.
- With a ruler and pencil, draw a horizon line about 6" up from the bottom. Using the 3/4" flat brush, apply two coats of Primary Cyan to the bottom section for the water. For the sky, use Titanium White at the horizon line. As you move up further in the sky, add drops of Cerulean Blue, increasing the Cerulean Blue and decreasing the Titanium White. At the horizon line, double-load brush with Titanium White and Cerulean Blue to blend.
- With painter's tape, position the compass from the Americana Decor Nautical Knot Stencil to the upper right. Using a cosmetic sponge and Raw Sienna, pounce on the stencil, being careful not to go over the sails.
- Mix (3) parts Titanium White, (1) part Cerulean Blue, and (1) part water. Lightly brush this mix over the compass, wiping back any excess with a paper towel. Paint the sails with the 3/4" flat brush and Titanium White.
- Sort and cut out the word clippings. (Vacation and travel brochures are a good source for words about travel, journey, and adventure.)
- Paint the sailboat and small flag with Pyrrole Red using a #3 round and #8 flat brush.
- Arrange the text over the painted canvas, re-positioning the wording until you are satisfied. Take a quick photograph or sketch of how the wording is placed for future reference. Remove the wording.
- Double-load a #8 flat brush with water and Primary Cyan. Outline the outsides of sails with the Primary Cyan side of the brush. Double-load the brush with Carbon Black and water, outlining the outside of the sailboat with the Carbon Black side of the brush.
- Position the wave stencil from the Americana Anchors Aweigh Stencil along the bottom of the boat and tape down. Pounce with a cosmetic sponge in Titanium White. Re-position the stencil slightly downward and to the right and apply Titanium White to the wave stencil again.
- Cut out a map into the desired shape (for the bottom right corner); edge with a cosmetic sponge and Pyrrole Red. Apply Americana Matte Decou-Page to the area and position the map. Apply an additional coat on top of the map.
- Tape down the wheel stencil in the upper left corner and the anchor stencil in lower right corner, both from the Americana Anchors Aweigh Stencils. (Overlap the anchor stencil over the map slightly.) Use Raw Sienna and a cosmetic sponge for both.
- Position in the upper right corner; tape down; and stencil the knot from the Anchors Aweigh Stencil with Raw Sienna. Repeat for the lower left corner. Tape down the rope stencil from the same stencil set along one edge. Re-tape and move the stencil until all four borders are painted, joining at the corners. (Refer to photo for placement.)
- With the #8 flat brush, add highlight to the tops and right sides of all roping and knots with Yellow Oxide. Add shading with Burnt Sienna on the left and bottoms of all knots and ropes. Dry-brush the water section with the 3/4" flat brush and Titanium White.
- Referring to your photo or sketch (see step 7), lay out all wording. Coat the backs of the words with Decou-Page, pressing down with fingers to smooth out the wrinkles. Apply an additional coat of Decou-Page on top of the wording.
- With a liner brush and Pyrrole Red, outline "Journey". Repeat outlining with Carbon Black around all the other words.
- Paint Pyrrole Red arrows around "Journey" using a liner brush. Add small accent marks and dots in Carbon Black. (Refer to photo for arrow placement.)
DOWNLOADS
Boat Body PatternBoat Sail Pattern

