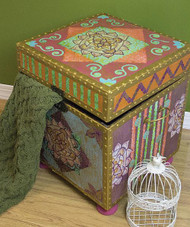
Indian Painted Boho Trunk
Posted by DecoArt on Feb 8th 2016
Bring out the bohemian in an old storage trunk with Americana Decor® Chalky Finish.
SUPPLIES
- water container
- palette or plastic plate
- paper towels
- scissors
- ruler
- pencil
- 2" flat brush
- 3/4" flat brush
- decorative paper
- cosmetic sponge
- storage trunk
- stamp of choice
- circle template
- image
- colored paper
INSTRUCTIONS
NOTES:
Let dry completely between painting steps.
- Clean the trunk to remove dirt and dust.
- Use a 2" flat brush to mix (3) parts Rouge, (2) parts Cameo, and (1) part Innocence. Use the mix to paint the trunk's top. Rinse brush. Use the same brush to mix (2) parts Rouge, (1) part Legacy, and (1/2) part Everlasting. Use the mix to paint for both sides. Rinse brush. Use the same brush with Everlasting to paint the lid sides. Rinse brush. Use the same brush with Escape to paint the front. Rinse brush.
- Use a 3/4" flat brush to apply Gold (Metallic) to the edges with the studs. Rinse brush. Use a finger to rub Gold (Metallic) on the raised snake skin. Wash hands.
- Pick a set of about four different decorative papers of choice, thick or thin.
- Use a pencil and ruler to measure a square/diamond to fit on the lid. (Shown: trunk lid measuring 10" square.) Use decorative scissors to cut paper to make it more interesting.
- Repeat on a contrasting color paper but make this one 8 "x 8" with the decorating scissors.
- Use a 2" flat brush to apply Americana Satin Decou-Page to the paper, quickly apply it to the trunk top, and use the brush with more Decou-Page to smooth out from the center out.
- Use the same brush to apply Decou-Page on a second contrasting decorative paper on the trunk top and brush more Decou-Page on over it.
- Print off a mandala of choice. Use regular scissors to cut out this shape. Use the 2" flat brush and Decou-Page to adhere the mandala on top. Rinse brush.
- Use a pencil and ruler to measure two other decorative papers to 8" x 8" and 6" x 6"; cut out with decorative scissors.
- Use the 2" flat brush to apply Decou-Page to the front of the trunk.
- Quickly put the biggest paper down and smooth out from the center outward; apply more Decou-Page on top to seal.
- Use the same brush to apply the smaller paper on top with Decou-Page; seal the paper.
- Apply the mandala of choice and seal with the Decou-Page. Rinse brush.
- Use regular scissors to cut out shapes from decorative paper. (I chose a paper with leaves to cut out.)
- Use the 3/4" flat brush and Decou-Page to apply the leaves (or other images) to the corners.
- Use the same brush to layer the leaves using three leaves per corner.
- Continue on all four corners sides. Rinse brush.
- Use the decorative scissors to cut short stripes enough to go around the lid sides.
- Use the 3/4" flat brush and Decou-Page to apply the stripes evenly spaced, leaving the Heritage showing in between the stripes. Rinse brush.
- Use another color paper to cut out more of the same sized stripes with the decorative scissors.
- Use two of those stripes to create a chevron pattern for the lid sides. Use Decou-Page to adhere and seal the chevron. Rinse brush.
- Use a pencil on the back of the patterned paper to trace a circle size of choice. (I used a 2-oz. acrylic paint bottle) Make multiple circles; cut out with regular scissors.
- Use the decorative scissors to cut long stripes using two different plain colored papers and the decorative papers.
- Cut mandalas for the trunk sides in half.
- Use a stamp of choice with Gold (Metallic) and a cosmetic sponge to apply patterns over the circles we cut out earlier.
- Use the 3/4" flat brush with Decou-Page to adhere the long strips to the sides around the handles. Apply more Decou-Page on top to seal. Rinse brush.
- Use the same brush and Decou-Page to adhere the mandala halves to each side and seal on top. Rinse brush.
- Cut spiral shapes from decorative paper. (You will need a total of eight.)
- Use the 3/4" flat brush and Decou-Page to apply the swirls by the corners.
- Use the same brush to apply a second swirl on the corners and add more Decou-Page on top to seal. Rinse brush.
- Create your own corner shapes for the front and use Decou-Page to adhere and seal. Rinse brush.
- Use Decou-Page to seal the entire piece.


