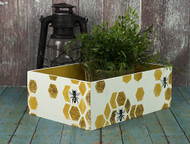
Stenciled Honeycomb Box
Posted by DecoArt on Dec 14th 2015
This wooden crate buzzes with color and interest compliments of Americana Decor® Chalky Finish paint.
SUPPLIES
- water container
- palette or plastic plate
- paper towels
- scissors
- painter's tape
- 2" flat brush
- cosmetic sponge
- large wooden crate
- andy skinner industrial cling stamps
- printed images
INSTRUCTIONS
NOTES:
Let dry completely between painting steps.
- Make sure the wooden crate is clean and dust free.
- Use a 2" flat brush and Everlasting to paint the entire outside of the crate. Rinse brush.
- Use the same brush and Inheritance to paint the entire inside of the crate. Rinse brush. Let dry completely.
- Place the Americana Busy Bee Stencil across the outer sides of the crate. Load a cosmetic sponge with Inheritance to lightly pounce on random honeycombs. (You can block sections with painter's tape or just hold in place with fingers.)
- Let the crate dry completely.
- Rip pieces of painter's tape to fit around one honeycomb at a time. (The tape will used be over random honeycombs.)
- Load a cosmetic sponge with Rustic and pounce it on the stamp. (I used the bottom crackled stamp from the Stampendous: Andy Skinner Industrial Stencils.) Stamp over the individual honeycomb. Repeat for the desired look.
- Print out some bumblebees of your choice, as many as you choose. Cut them out with scissors.
- Use a 3/4" flat brush and Americana Matte Decou-Page where you want the bumblebees to be.
- Immediately adhere the printed out bee and smooth out any air bubbles. Brush more Decou-Page on top to seal. Rinse brush.
- Let dry completely.

