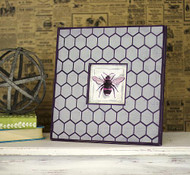
Honeycomb Frame With A Bee
Posted by DecoArt on Oct 1st 2014
Stencil a wooden frame with a honeycomb and add a bee for a sweet room accent.
SUPPLIES
- water container
- palette or plastic plate
- paper towels
- ruler
- 1" flat brush
- #2 round brush
- fine-grit sandpaper
- 1/2" flat brush
- 1" painter's tape
- black permanent marker
- cosmetic sponge
- craft sticks
- small jar with lid
- 12" x 12" wooden frame
INSTRUCTIONS
NOTES:
Let dry completely between painting steps.
- Dust off the frame and remove the cardboard and plastic or glass from the frame opening.
- Mark the jar 1 centimeter (or 1/4") up from the bottom and then 2 centimeters (or 1/2") up from the bottom with a black permanent marker. Pour Legacy up to the first mark and then Romance up to the second mark. Stir the colors with a craft stick to mix.
- Paint the front of the frame with the Legacy/Romance mix and the 1" flat brush.
- Lay the Busy Bee Stencil on the dry frame and tape into place. Using the cosmetic sponge and Yesteryear, apply the stencil to the frame.
- Remove the stencil and, when dry, paint Yesteryear around the opening of the frame, leaving a 1/8" border.
- Use the #2 round brush and Yesteryear to paint the inner frame area and the sides of the opening. (See photo for placement.)
- Double-load the 1/2" flat brush with the Legacy/Romance mix and Yesteryear to paint the sides of the frame.
- Sand the frame very lightly on the top and a little harder on the edges. Insert a photo.


