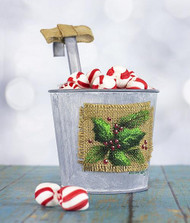
Primitive Holiday Tin
Posted by DecoArt on Nov 21st 2014
Embellish a tin pail with a design painted on burlap for a rustic holiday accent.
SUPPLIES
- water container
- palette or plastic plate
- paper towels
- burlap ribbon
- #0 liner brush
- stylus
- red ribbon
- white graphite paper
- #12 shader brush
- #16 shader brush
- holiday greenery
- white-washed tin with burlap patch
- fabric pen
INSTRUCTIONS
- Place a good sheet of white graphite paper between the pattern and burlap, on the front of the tin, and trace on the pattern with the fabric pen, using as much pressure as you can. (A sheet of wax paper over the pattern might help keep it intact.)
- Free-hand any tracing that doesn't transfer. Use a straight line as a pattern for the pine branches. (No need to trace on the holly berries as you can place them where needed when all painting is finished.)
- Line in the branch with a #0 liner brush and Coffee Bean.
- Using the liner brush, pull needles, beginning at the branch and pulling outward, with Green Beret, then Leprechaun, and then Apple Green, in the lightest areas only.
- Base the holly leaves with Green Beret using a shader brush.
- Highlight the top side of the holly leaves with Apple Green.
- Shade at the base of the leaves with a 1:1 mix of Green Beret and Black Tie. Let dry.
- The veins are Apple Green with the #0 liner brush.
- The berries are placed on the holly by dipping the handle end of a #0 liner brush back into Dark Scarlet and scattering whenever you like.
- When the berries are dry, using the small end of a stylus, add a highlight dot with White Birch. Let dry.
- (Optional) Add holiday greenery of your choice to the tin handle, using the red and burlap ribbon.

