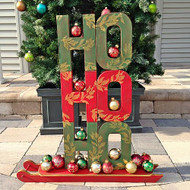
HO HO HO Sign with Sled and Ornaments
Posted by DecoArt on Dec 21st 2015
This cheerful sled is suitable as an indoor accent or for a outdoor patio or porch.
SUPPLIES
- water container
- palette or plastic plate
- paper towels
- sandpaper
- painter's tape
- 1" chip brush
- 1/2" flat brush
- wooden sled
- plastic ornament
- 1/2" stencil brush
- E6000 Glue
- papier-mâché letter
INSTRUCTIONS
NOTES:
Let dry completely between painting steps.
- Lightly sand any rough edges of the wooden sled. Use a damp paper towel to remove any sanding dust.
- Paint the front, back, and edges of the sled with Geranium Red using a 1" chip brush. Work the paint into the surface by continuously brushing the paint onto the sled until it is opaque.
- Paint a rough, dry-brush coat of Rich Espresso (Metallic) over the front and back of the sled, purposefully letting the Geranium Red show through.
- Paint Splendid Gold (Metallic) onto the edges of the sled with a 1/2" flat brush.
- Clean the surface of the papier-mâché letters by wiping with a paper towel.
- Cover each letter with two thin coats of White Gesso.
- With a chip brush, paint one set of "HO" letters with two coats of Geranium Red. Paint the remaining sets of letters with two coats of Sprout Green.
- Paint a rough, dry-brush coats of Rich Espresso (Metallic) over the front, back, and sides of each letter, purposefully letting the Geranium Red or Sprout Green show through.
- Attach each set of "HO" letters together using E6000 Glue. Mark, with painter's tape, the area where the glue needs to be applied to avoid spreading glue beyond that point.
- Use painter's tape to mask a section of the Americana Jacobean Floral Stencil on top of one set of letters. Stencil the design onto the letters using Splendid Gold (Metallic) and a 1/2" stencil brush.
- Repeat the stenciling for each set of letters. (Vary the placement of the stencil over the letters for visual interest.)
- Position one set of letters and attach to the sled using E6000 Glue.
- Position another set of letters on top of the previous set of letters and attach together using E6000 Glue. Repeat this step for the final set of letters.
- Attach small plastic ornaments to the sled and letters using E6000 Glue.

