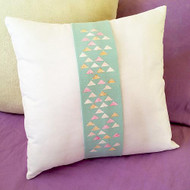
Geometric Art Pillow Wrap
Posted by DecoArt on Jan 14th 2015
Change a pillow easily by adding a simple wrap with soft color in modern geometric shapes.
SUPPLIES
- water container
- palette or plastic plate
- paper towels
- pencil
- #10 flat brush
- parchment paper
- iron and ironing board
- 1" sponge brush
- freezer paper
- craft knife
- Silhouette electronic cutting machine
- fabric pillow wrap
INSTRUCTIONS
NOTES:
Let dry completely between painting steps.
- Use a pencil to draw on triangles on the freezer paper. (The number and location of the triangles is your choice.) Or you can use a Silhouette electronic cutting machine and a Silhouette image of triangles found online.
- Use an iron and ironing board to smooth out any wrinkles on the pillow wrap. Apply the freezer paper stencil by ironing it onto the fabric, shiny side down.
- Place the parchment paper down to protect the work space.
- Use a 1" sponge brush and White to paint over a majority of the triangles. Rinse brush. Let dry for about 10 minutes, depending on the application.
- Use a #10 flat brush and Celebration Pink to paint some of the triangles. Wipe off the brush, but do not rinse.
- Use the same brush and Gold Glitz to paint some more triangles. Wipe off the brush, but do not rinse.
- Use the same brush to pick up a little Celebration Pink and a little Gold; wipe off some on a paper towel. Use a dry-brush technique to fill in the remaining triangles. Rinse the brush.
- Go back and add more coats of paint to the triangles, if desired. Rinse the brush.
- Use a #10 flat brush and Ice Crystal to paint over the White triangles. Rinse the brush. Let dry completely.
- Once fully dry, remove the stencil.


